One Horse or a Hundred-Composting - How Do I Do That? (WO1025)
DOWNLOADOctober 23, 2015 - Christine Skelly
 Print
Print Email
EmailIf you have been following the “One horse or one hundred” series closely, you may have already decided that composting is the answer to many of your manure management problems. You may now be asking, “How do I do that?” The objective of this article is to look at several methods of composting from a “how-to” perspective so that you can begin your composting project.
Composting does not have to be a complicated process, but it does require management. Remember that compost is NOT just a pile behind the barn. Composting is a biological process that creates an ideal environment for naturally occurring microbes that digest organic material. With this in mind, let’s take a look at how to create the ideal environment.
General Composting Requirements
Aeration
The microbes that make the composting process work are aerobic; this means that they require oxygen. The composting process produces heat. Therefore, the pile needs to be aerated to provide the microbes with oxygen and to remove excess heat from the pile. If oxygen levels get too low, an increase in anaerobic bacteria occurs, resulting in increased odor from the pile. Excess heat can be fatal to the microbial population. The ideal temperature range of compost is between 130 and 160 degrees F. At these temperatures, most weed seeds, parasites and pathogens will be killed.
Carbon to nitrogen ratio (C:N)
Carbon is supplied by the bedding material (shavings and straw) and the fibrous portion of the manure. Nitrogen is found in both manure and urine. Nitrogen is “food” for the microbes. Too little nitrogen will slow the composting process. Too much nitrogen can increase odors because of the buildup of ammonia gas. Because most horse owners use wood shavings for bedding, the amount of nitrogen is usually limiting. The desired C:N range for composting is 25 to 40 parts carbon to 1 part nitrogen. Minimizing the amount of dry bedding going into the compost pile will improve the C:N ratio. Mixing active compost with new raw material can help balance the ratio. When carbon is in excess, a nitrogen source such as urea fertilizer can also be added to provide nitrogen for the microbes.
Average carbon to nitrogen ratios
- Horse manure — 30:1
- Straw — 80:1
- Softwood shavings — 641:1
- Hardwood shavings — 561:1
- Grass clippings — 17:1
- Leaves — 54:1
Materials such as meat, dog and cat feces, sand, oils or other household wastes should not be added to the horse manure compost. Leaves and grass clippings could be added to the compost pile on a limited basis. Because of their high moisture content, they should be well incorporated into the compost. Other yard and garden waste should be avoided.
Moisture
Achieving the correct moisture content is another critical part of generating quality compost. During the composting process, the pile should be around 50 percent moisture. The best way to estimate moisture content is to dig into the pile, take a handful of compost and squeeze it. The compost should feel like a wrung-out sponge. Compost that is too wet will have lower oxygen levels and increased odors. If the compost gets too dry, the composting process will slow or stop before the compost is finished. Most horse manure with wood shavings for bedding is too dry and will require additional water to complete the composting process. One easy way to add moisture is to dump the water bucket into the raw material while cleaning stalls.
It is a common misconception that compost should be left uncovered to take advantage of rain or snow to increase the moisture content. The water from precipitation comes too fast to penetrate the pile and can lead to nutrient runoff. Additionally, sun and wind will dry out an uncovered pile. Therefore, the pile should be covered and additional moisture added during aeration. Unless a specially designed compost cover is used, the cover should not be in direct contact with the compost.
Location
Because compost starts out as raw manure and bedding, all Michigan Right-to-Farm guidelines apply when locating a compost pile. For a copy of the most recent guidelines, visit www.michigan.gov/mda and search for the manure management generally acceptable agricultural management practices (GAAMP). In general, compost piles should be easily accessible from the source of the manure and for easy removal of the finished product. Horses should not have contact with the pile. Depending on the composting method to be used, it may be necessary for the pile to be close to electricity and a water source. Compost piles should be located on relatively level ground and away from any water runoff from barns or hillsides.
Space requirements
The amount of space required for composting will vary with composting methods, willingness to manage the pile, the composition and quantity of the raw material, and environmental factors. Starting composting when temperatures are below 50 degrees F is very difficult. Therefore, additional space may be needed for winter stockpiling.
Performing some rough calculations to estimate annual composting volume will help determine which composting method to use. As an example, assume two horses are housed in stalls. They will produce 0.8 cubic foot of manure and urine per day (about 50 pounds). In addition, 1 to 5 cubic feet of wood shavings will be removed from the stalls daily. That is 0.8 cu. ft. manure/urine + 2 cu. ft. bedding per horse X two horses X 365 days = 1,168 cu. ft. (43.26 cu. yds.) per year. This volume can be significantly reduced if the horses are turned out on pasture for even a portion of the day. If a significant amount of wasted hay is expected, that volume should be added to the calculation.
Equipment
Regardless of composting methods, a couple of pieces of equipment are necessary. A long probe thermometer (dial or digital) is necessary to monitor temperature. Another helpful piece of equipment is a compost maturity test kit. This relatively inexpensive test kit will help determine if the compost is finished and ready to use.
Composting Methods
Turned windrow
This method of composting involves piling raw material in long, arched rows. The length of the row depends on the amount of material to be added. The rows should be created on a well drained base with no more than a 1 to 2 percent slope. The base could be, soil, gravel, or crushed limestone. Cement or asphalt could also be used under the windrows, as long as runoff water is either contained or filtered through a grassy area surrounding the composting area. The windrows should be 5- to 8-feet high and from 8- to 10-feet wide. Smaller rows will lose heat more quickly, and this heat loss can slow the composting process. It is important that the rounded top of the row has no flat spots that can hold water. These rows can be created by unloading a manure spreader at the end of the row as needed, or by simply using a wheelbarrow or other means to dump the material at the end of the row. Then a tractor with a front-end loader can be used to shape the row. Again, it is ideal to cover the rows. One method for covering the rows is to place 6 inches of finished compost or peat moss on the top of the row each time it is turned.
As the row is being formed, it will begin to heat up. The temperature should be monitored regularly and the row turned as the temperature approaches 160 degrees F (usually in 7 to 10 days). Turning can be accomplished by using a front-end loader to simply move the pile from one place to another — for example, pushing the row over, right next to where it was, and then back. The row should be reshaped each time it is moved. This is also a good time to add any needed water. A sprinkler can be used to wet the material as it is being moved from one place to another. Another way to wet the rows is to insert a tree root waterer in numerous places in the row before turning. Another method is to use a mechanical compost turner to turn the windrows. Many sizes and types are available. This type of equipment will greatly reduce the amount of time required to turn the rows and will generally speed up the composting process. Although compost turners are relatively expensive, they greatly reduce labor. They would generally be used only on large farms.
Compost made with this method will generally take about 8 to 12 weeks to complete. The more the row is turned, the more quickly the row will compost. If the compost is not close to maturity and the pile’s temperature drops below 130 degrees F, stop turning to allow the pile to heat up again.
Transfer bins
Composting using transfer bins is very similar to windrow composting. Raw material is added to a bin and turned with a front-end loader or by hand. Bins can be constructed of almost any material that can withstand pressure from the loader. Large cement blocks, railroad ties, landscape timbers or treated lumber can make good bins. For ease of turning, the bins should be constructed on a well compacted base of gravel or crushed limestone. Cement or asphalt could also be used as long as the bins are constructed to prevent water pooling. Four to eight bins are needed to complete the composting process. As shown in Figure 1, bins are typically open-fronted, 8 feet by 8 feet, and 3 to 6 feet high. For a farm with just a couple of horses, the bins can be even smaller, but the depth should be a minimum of 3 feet. Leaving some small gaps in the wall materials will allow air flow into the pile. The bins should be covered. If a roof is too expensive, a tarp can be used to create a tent over the bin. The tarp should not touch the compost and should not be allowed to sag and collect water.
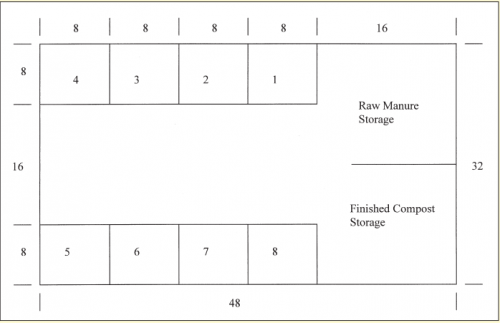
Figure 1. 32 X 48' Transfer bin compost structure with raw manure and finished compost storage
In bin composting, raw materials are added to the first bin, and temperature and moisture are monitored. When the bin gets full and/or the temperature gets close to 160 degrees F, the material is transferred to the next bin. Raw material is then added to the first bin. All bins need to be monitored regularly and transferred as needed. As the volume of the material begins to decrease, bins can be mixed together to conserve space. By the time the material reaches the final bin, it should be finished compost. The length of time required will depend on how rapidly the bins are filled. Once the process is initiated, active compost can be added to the first bin to introduce microbes to the pile and speed the process. If additional moisture is needed, it can be added during the transfer or before the pile is moved.
Passive or active aeration
These two methods of composting require the least equipment but the same amount of monitoring as the other methods. For both passive and active aeration, a windrow 5- to 8-feet high by 8- to 10-feet wide will be created, as shown in Figure 2. This material should be well mixed because it won’t be turned again. Again, this windrow should be covered.
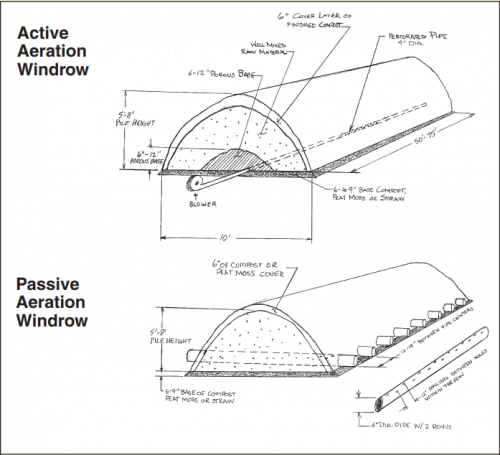
Figure 2. Active and passive aeration windrows
Passive aeration involves using 4-inch drain pipe with two or three rows of 1 ⁄2-inch holes drilled every 12 inches. With passive aeration, air flow through the pipes is forced out through the holes by wind currents, aerating the row. Ideally the row is created on a 6-inch-deep mat of finished compost, straw or peat moss. As the row is formed, a pipe is added perpendicular every 12 to 18 inches near the base of the row. It is important that both ends of the pipe stick out from the row. Rows can be any length. If the pile begins to heat up too much because of lack of air flow, simply cap one end of each pipe and insert a leaf blower or another type of fan in the other end to force more air into the pile. Additional moisture can be added, as needed, using a tree root waterer or another similar device. Although this may be the slowest type of composting, it requires the least labor once the pile is made and the process is started.
Active aeration is similar to passive aeration except that the system is designed for forced air through the entire process. For this method, the row is created with the perforated pipe at the center of the row, running parallel to it. The pipe should stop 5 to 8 feet from one end of the row and stick out from the other end. As with passive aeration, the pipe should be placed on a 6-inch-deep base material. A mechanical blower hooked to the pipe blows air through the row. Temperature should be monitored regularly to determine the amount of time the blower needs to be operated. For this method, the capacity of the blower being used will limit the length of the row.
Vermicomposting or in-vessel composting
These two methods of composting are not as likely to be used on horse farms, so the specific methods will not be discussed. Vermicomposting is the use of redworms to digest the manure and bedding. This method yields very high quality compost, and excess worms can be harvested and sold. This process will work only when the ambient temperature remains above 50 degrees F, however. In-vessel composting is a highly mechanized method involving a rotating drum and forced aeration. This highly controlled process is typically cost-prohibitive for small operations.
Determining when compost is finished
The three main indicators that compost is finished are that the pile volume has been reduced by 50 percent or more, all the material is 1 ⁄2 inch or smaller, and the temperature has dropped to near ambient temperature. This assumes that the amount of nitrogen and moisture were correct during the composting process. A compost maturity kit is an easy way to test whether compost is ready to use. Even when compost is mature, it should not be used as a potting amendment or around sensitive plants until it has cured for 6 months to a year. Recently matured compost can be safely used on pastures, crop fields, lawns, gardens and most landscaping.