


Setting a trail course for success
 Print
Print Email
EmailA great deal of thought, skill and planning should be considered when creating and setting up a trail course at a horse show.
Competing in a trail class with your horse can be an intimidating and difficult endeavor. Even the most talented horse and rider combination can be challenged by a well-designed trail course, and unfortunately, a poorly-designed trail course can go from challenging to impossible for even the most seasoned exhibitors. In this article, we will discuss several commonly-seen mistakes in poorly-designed trail patterns and how to fix or prevent them, all with the goal of setting exhibitors up for success.
Know your measurements
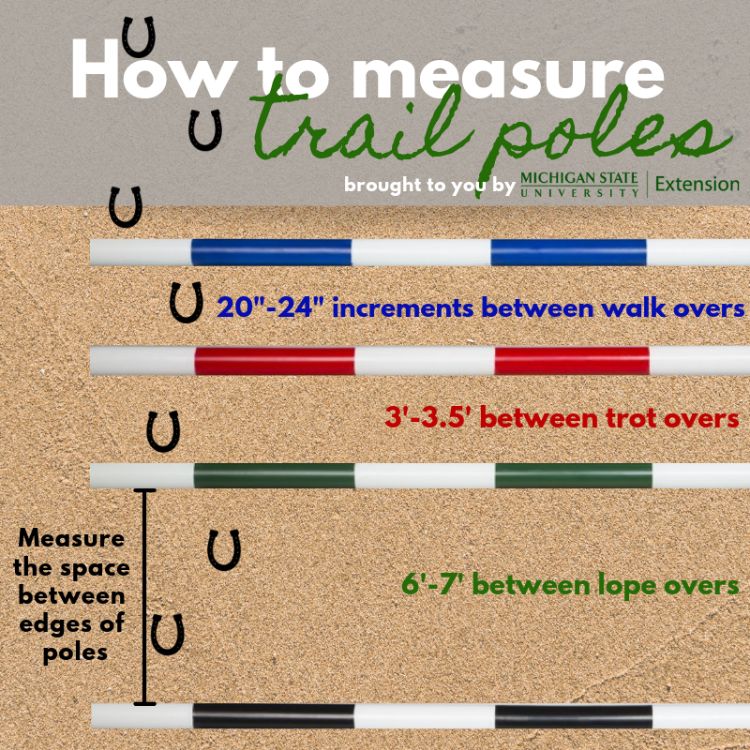
If you are involved in creating or setting a trail course in any way, you should be familiar with the appropriate measurements obstacles are to be set at, provided in the Michigan 4-H Horse and Pony Project Show Rules and Regulations, which is available to download for free from Michigan State University Extension. These measurements are the industry standards and follow the American Quarter Horse Association’s guidelines. A trail course used in competition should never be set without using a measuring device. Never just guess, eyeball or use your own feet to measure. The space between the logs is to be measured and the path the horse is to take should be the measuring point. Measurements are provided and should be followed for several reasons.
- They provide consistency between exhibitors. This means that any time a pole or any object is hit by a horse, measurements should be checked before the next exhibitor is allowed on course.
- They allow obstacles to be spaced according to an average horse’s stride length. This will reduce the number of times an obstacle is hit by horses and reduce the time needed to fix and remeasure obstacles. A common misconception is that a small pattern equals a quick pattern, resulting in a shorter show. The opposite is actually true—a pattern not spaced for an average horse’s stride is likely to trap exhibitors into making more mistakes and require more re-setting of obstacles.
- The measurements are as follows:
- Enough space must be provided for a horse to jog at least 30 feet and lope at least 50 feet for the judges to evaluate these gaits.
- Walk-overs should be spaced in increments of 20 – 24 inches apart.
- Trot-overs should be spaced in increments of 3 – 3.5 feet apart.
- Lope-overs should be spaced in increments of 6 – 7 feet apart.
- Wooden bridges must be a minimum 3-feet wide and 6-feet long.
- Back-through obstacles between cones must be spaced a minimum of 28 inches apart. Back-through obstacles between poles must be spaced a minimum of 36 inches apart. These are the minimum measurements for the most-skilled horse and rider. At an entry-level competition, it would make sense for these back-through obstacles to be wider to allow more exhibitors to successfully navigate the obstacles.
- Boxes made of poles should be 5-to-8-foot squares. If you ask the exhibitors to travel through a box without stopping, you must create a box that allows for the appropriate stride distances mentioned above. This may mean overlapping poles or not having poles touch at each corner. Additionally, asking exhibitors to stop in a box from any gait faster than a walk is very difficult and should be reserved for advanced divisions only.
Allow room for transitions
All too often, trail courses are set according to a picture or drawing of a pattern in an arena that may or may not be to scale. When setting a course based on a drawn pattern, the course setters must make accommodations for the overall arena size, the footing, the space needed to complete each obstacle and the amount of space needed between obstacles. Course designers and setters should not think, “Can a good horse squeeze in this amount of space?” but instead ask themselves, “Is this enough room for a large horse to comfortably perform a credit-earning maneuver here?”
Never set-up a pattern to create an unnecessary challenge for a horse and rider. A talented horse and rider will rise to the top in a pattern that is set up appropriately, providing consistent and ample space for each maneuver to be performed. On the other hand, a more novice duo may be able to perform the obstacles without the added difficulty from a poor set up, and they’ll more likely be encouraged to come back and try again.
Let the judge place the class
Do not design a pattern that places the class. What do I mean? A judge never wants to place a class based on the “best of the worst” or have the winner be whomever could make it through with the least number of penalties. A well-designed trail course will allow the judge to evaluate exhibitors based on the number of positive, credit-earning maneuvers, no matter the skill level of the horses and riders. Talk about a judge’s dream come true! This would mean that whomever creates the pattern should be very familiar with the level of exhibitors that will be competing. Beginner-level patterns should look much different than an advanced-level class.
The elusive 12-foot pole
Here’s the dilemma: Most patterns are designed to use 12-foot poles while most horse shows have only 8-foot poles. This means that serious considerations and alterations must be made when laying out a trail course.
A great example is when poles are set in a “fan” or “wagon wheel”—think of laying out a + (plus) sign with poles. Even with 12-foot poles, they should not touch at the center of the fan/wagon wheel/+ sign. A cone should be placed in the center and the inner-most edge of a 12-foot pole should be 2.5 feet from the edge of the cone. This will essentially create a circle with a 29-foot diameter. If an 8- foot pole is being used for this obstacle, the inner-most edge of the pole should be 6.5 feet from the cone placed in the center. This will create a path that will allow a horse to successfully travel the circle or curve. The path of travel that should be measured for stride distances three-fourths of the distance down the pole (towards the outside of the circle).
Trust me, this one is a game changer for most shows; replacing 12-foot poles with 8-foot poles without making alterations is an all-too commonly made mistake. In addition, a wagon wheel is a very difficult obstacle for even seasoned competitors and shouldn’t be over-utilized at entry-level shows. If a wagon wheel is utilized, consider having exhibitors only travel over one or two poles at a time. Patterns can also be designed so that exhibitors are to “go out” and “come back in” to the wagon wheel.
Ask for help
Reach out to seasoned exhibitors in the area or a local judge. Most seasoned competitors and judges would be happy to help in their area of expertise. They can create patterns for you or review ones that you’ve created. The same can be said once the pattern is set up in the arena. Additionally, the judge should always walk and measure the course before the class begins.