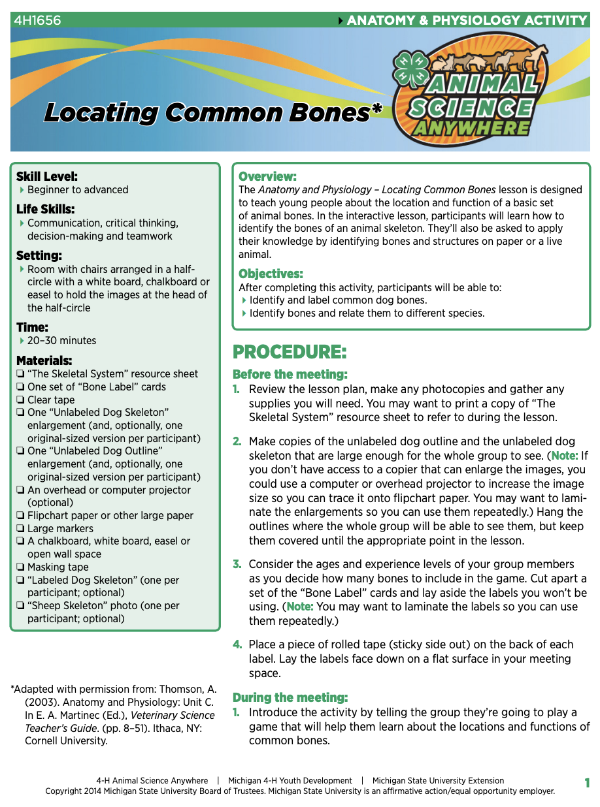
4-H Animal Science Anywhere: Locating Common Bones
DOWNLOADJune 10, 2020 - Michigan State University Extension
 Print
Print Email
EmailSkill Level:
Beginner to advanced
Life Skills:
Communication, critical thinking, decision-making and teamwork
Setting:
Room with chairs arranged in a half-circle with a white board, chalkboard or easel to hold the images at the head of the half-circle Time: 20–30 minutes
Materials:
- “The Skeletal System” resource sheet
- One set of “Bone Label” cards
- Clear tape
- One “Unlabeled Dog Skeleton” enlargement (and, optionally, one original-sized version per participant)
- One “Unlabeled Dog Outline” enlargement (and, optionally, one original-sized version per participant)
- An overhead or computer projector (optional)
- Flipchart paper or other large paper
- Large markers
- A chalkboard, white board, easel or open wall space
- Masking tape
- “Labeled Dog Skeleton” (one per participant; optional)
- “Sheep Skeleton” photo (one per participant; optional)
Overview:
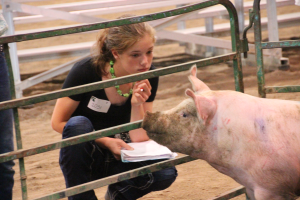
The Anatomy and Physiology – Locating Common Bones lesson is designed to teach young people about the location and function of a basic set of animal bones. In the interactive lesson, participants will learn how to identify the bones of an animal skeleton. They’ll also be asked to apply their knowledge by identifying bones and structures on paper or a live animal.
Objectives:
After completing this activity, participants will be able to: Identify and label common dog bones. Identify bones and relate them to different species.
PROCEDURE:
Before the meeting:
- Review the lesson plan, make any photocopies and gather any supplies you will need. You may want to print a copy of “The Skeletal System” resource sheet to refer to during the lesson.
- Make copies of the unlabeled dog outline and the unlabeled dog skeleton that are large enough for the whole group to see. (Note: If you don’t have access to a copier that can enlarge the images, you could use a computer or overhead projector to increase the image size so you can trace it onto flipchart paper. You may want to laminate the enlargements so you can use them repeatedly.) Hang the outlines where the whole group will be able to see them, but keep them covered until the appropriate point in the lesson.
- Consider the ages and experience levels of your group members as you decide how many bones to include in the game. Cut apart a set of the “Bone Label” cards and lay aside the labels you won’t be using. (Note: You may want to laminate the labels so you can use them repeatedly.)
- Place a piece of rolled tape (sticky side out) on the back of each label. Lay the labels face down on a flat surface in your meeting space.
During the meeting:
- Introduce the activity by telling the group they’re going to play a game that will help them learn about the locations and functions of common bones.
- Ask the group the following questions:
- What is a bone? (The hard parts of an animal’s skeleton.)
- What are some of the main reasons animal bodies have bones? (To protect the body’s vulnerable internal organs, to support the structure of the body, to enable animals to move.)
- Why is it important for you to know where the bones are located in an animal’s body? (So you know where to check for broken bones and other injuries; to make sure that equipment such as harnesses, bridles, halters and saddles fit properly; to avoid using a potentially damaging brush such as a curry comb on a tender spot where the bone is close to the surface.)
- Record their answers on flipchart paper and display the sheets where everyone can see them.
- Next ask for volunteers to name some common bones that most animals have. As participants name a bone, describe its location and function, then place the correct label for it on the unlabeled dog skeleton enlargement. When the group can’t think of any other bones, use the “Skeletal System” resource sheet to provide information about the locations and functions of any major bones they may have missed.
- Now remove any labels you may have placed on the unlabeled dog skeleton enlargement and tell the group it’s time to play the game.
- Explain that they’ll take turns coming to the front and choosing one of the “Bone Label” cards that are lying face down. Once they’ve chosen a label, they will try to place it on the right spot on the unlabeled dog skeleton.
- After a player has finished a turn, have the next person come up and either move the previous player’s label to what they think is the correct bone, or choose a new label to place. Have them continue this process until they’ve placed all of the labels on the skeleton.
- Now work with the group to make sure that all of the labels are correct. If you have to move a label, explain why the correction was needed. (Note: You can use the labeled dog skeleton from the “Skeletal System” resource sheet if you need help making corrections.)
- If you have enough meeting time and the group is still interested, play another round of the game using the dog skeleton, or play it using the dog outline instead.
- Challenge the group to review the bones on their animals at home to help them continue to improve their bone identification skills. Show them the photo of the sheep skeleton from Michigan State University and explain that students and researchers at universities and private companies continue to study the structure, functions and locations of bones.