A Field Guide To Soil Sampling
DOWNLOADOctober 13, 2022 - Christina Curell and Christine Charles, Michigan State University Extension
 Print
Print Email
EmailA Field Guide to Soil Sampling
Adapted from Darryl D. Warncke's Sampling Soils for Fertilizer and Lime Recommendations (E498) (Michigan State University [MSU] Extension, 2000) and written to be in line with the Tri-State Fertilizer Recommendations for Corn, Soybean, Wheat and Alfalfa (974) (Ohio State, MSU Extension, Purdue Extension, 2020)
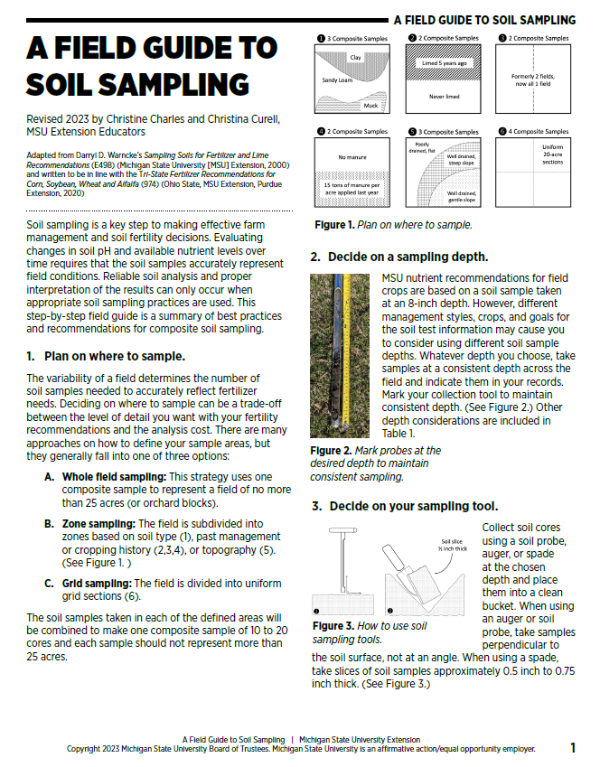
Soil sampling is a key step to making effective farm management and soil fertility decisions. Evaluating changes in soil pH and available nutrient levels over time requires that the soil samples accurately represent field conditions. Reliable soil analysis and proper interpretation of the results can only occur when appropriate soil sampling practices are used. This step-by-step field guide is a summary of best practices and recommendations for composite soil sampling.
1. Plan on where to sample.
The variability of a field determines the number of soil samples needed to accurately reflect fertilizer needs. Deciding on where to sample can be a trade-off between the level of detail you want with your fertility recommendations and the analysis cost. There are many approaches on how to define your sample areas, but they generally fall into one of three options:
-
- Whole field sampling: This strategy uses one composite sample to represent a field of no more than 25 acres (or orchard blocks).
- Zone sampling: The field is subdivided into zones based on soil type, past management or cropping history, or topography.
- Grid sampling: The field is divided into uniform grid sections.
The soil samples taken in each of the defined areas will be combined to make one composite sample of 10 to 20 cores and each sample should not represent more than 25 acres.
2. Decide on a sampling depth.
MSU nutrient recommendations for field crops are based on a soil sample taken at an 8-inch depth. However, different management styles, crops, and goals for the soil test information may cause you to consider using different soil sample depths. Whatever depth you choose, take samples at a consistent depth across the field and indicate them in your records. Mark your collection tool to maintain consistent depth. Other depth considerations are included in Table 1.
Table 1. Sample Depth.
|
System consideration |
Sampling depth suggestion |
|
Turfgrass and lawn |
4” to 6” |
|
Plowed soils |
Should be sampled to the depth of plowing |
|
Reduced-tillage systems and no-till systems |
2” to 4” for pH/liming recommendations & 8” for fertility analysis |
|
Field has annually surface applied nitrogen without incorporation |
Collect a second sample to a depth of 3" to 4" for an accurate soil pH reading. |
3. Decide on your sampling tool.
Collect soil cores using a soil probe, auger, or spade at the chosen depth and place them into a clean bucket. When using an auger or soil probe, take samples perpendicular to the soil surface, not at an angle. When using a spade, take slices of soil samples approximately 0.5 inch to 0.75 inch thick.
4. Collect at least 10 cores in a zigzag pattern to create each composite sample.
Studies have shown that a representative composite sample is best generated by using a zigzag sampling pattern in which the sampling points are taken at predetermined distances based on the dimensions of the field. Scrape aside the plant residue before taking your soil sample. Avoid sampling (or sample separately) areas with lots of equipment traffic, wet spots or depressions, locations of former farmsteads or animal enclosures, areas where lime is stored before application, or areas that have been highly eroded.
5. Thoroughly mix the soil cores.
After you take all the cores for one composite sample, mix the soil thoroughly. Be sure to break up the soil cores, and discard any stones and crop residue. For soils that are quite wet and contain significant amounts of clay, you may need to partially air-dry the soil prior to mixing the soil. Never dry your soil samples in a microwave or oven as this can damage the accuracy of laboratory analysis.
6. Fill the sample bag.
Fill the sample bag with a well-mixed, composite sample.
7. Complete the information form.
Fill out the information form with all the pertinent information needed for each soil sample.
8. Send the composite sample(s) and completed form to the lab.
Follow the mailing instructions on your soil sample kit. You should receive soil test results with MSU fertilizer recommendations within two weeks of sending the sample.
How often should I test my soil?
- Sampling and testing the soil in each field every 3 to 4 years is adequate.
- In sandy soils, nutrient levels may change rapidly because of crop uptake and leaching. In that case, you may prefer to sample more frequently.
When should I test my soil?
- Late fall or spring before planting are ideal times for soil sampling. If you plan to apply lime, fall sampling produces the most accurate recommendations.
- Soil nutrient content fluctuates depending on the season and plant demand.
- Sampling should occur at the same time to be consistent year to year.
Sources
Culman, S., Fulford, A., Camerata, J., & Steinke, K. (2020). Tri-state fertilizer recommendations for corn, soybean, wheat and alfalfa (974). Ohio State, MSU Extension, Purdue Extension.
Warncke, D. D. (2000). Sampling soils for fertilizer and lime recommendations (E498). Michigan State University Extension..
Find more MSU Extension material at https://www.canr.msu.edu/outreach/ .