Starting a Leaf Collection
Explore more videos from MSU Extension's Environmental and Outdoor Education Team. Print
Print Email
Email Whether displaying your leaves for a scientific collection, a county fair, or for an arts and craft project, Seth shares several ways to have fun and success with this fun and inexpensive project. Contact Seth Martin at mart1885@msu.edu.
Related activities and resources:
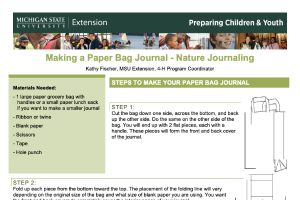
- Making a Paper Bag Journal - Nature Journaling
- coming soon: Leaf Pressing Handout
Learn more with the BeLEAF It or Not! series. A few of forestry professor Georgia Peterson's videos are below:
- BeLEAF It or Not! How to identify trees - Part 1 of 2
- BeLEAF It or Not! How to Identify Trees - Part 2!
- BeLEAF It or Not! Why do leaves change color in the fall?
Video Transcript
Hi, I'm 4-H program coordinator set Martin from the environmental and Outdoor Education Team, with MSU Extension. Today we're going to focus on preserving leaves, are were gonna teach you how to start a leaf collection. Step one of our process is collecting leaves. Be sure to identify the tree or plant you are collecting leaves from. You don't want leaves that are too wet, like this one here, the you can see has water droplets on it or too dry and brittle like this one that'll crack or rip. When you bend it. be sure to get a nice pliable from a tree and to select the whole leaf. Like this one here from this cottonwood Step two of our process is pressing the leaves. But before we begin, you need to collect a few things from around your home. The first is an absorbent piece of paper like newspaper. The second is Cardboard. The third a heavy stack of books. You're going to layer these by starting with a strip of cardboard then a piece of newspaper. You'll lay your leaf on top of the newspaper. Then comes another piece of newspaper, another piece of cardboard. And the heavy books on top. Heavy books will help draw some of the moisture out into the newspaper to dry out your leaf. You may press several leaves at once, adding alternating layers of newspaper and cardboard with the heavy pile of books on top, your leaves will take around two weeks to dry in the press, depending on weather and humidity. You can help your leaves dry faster by changing out the newspaper. Mount your leaves on heavy paper or car stuck with glue. Don't put too much glue. So it seeps through or around the leaf put a piece of wax or parchment paper on both the top and bottom of your specimen. Put it under a weight until the glue dries. Step five, label your leaf. Be sure to include the scientific name of the plant, the common name of the plant, the location of where it was found, data was collected, and any other notes or comments on your piece of card stock where your leaf is pressed. Our sixth and final step is to decide what to do with your Leaf You can put it in a page protector and put it in a binder and arrange all the leaves that you press and collect, or you can give it as a gift, such as a birthday card or Mother's Day cards. Thanks for joining us today to learn about preserving leaves and starting a leaf collection. Be sure to check our other videos from MSU Extensions, environmental outdoor education Team.