How to copy an event in dotCMS
Learn how to copy and edit an event in dotCMS.
- Log into dotCMS.
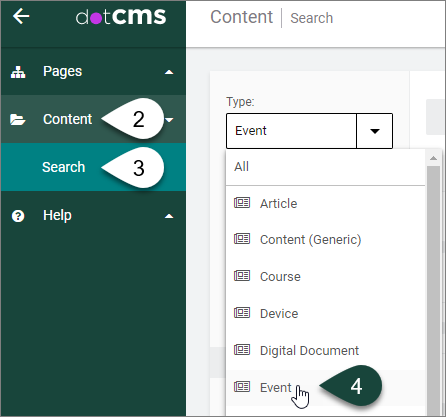
- Select Content on the left side of the screen.
- Select Search.
Content Dashboard
- Select Event from the Type drop-down menu.
- In the Search field, type in the Title of the Event to be copied.
NOTE: It is preferred to copy an Event that is currently Unpublished, as the resulting copy will also remain Unpublished. However, if you copy a Published Event, the resulting “copy” will also be Published and get pushed live.
TIP: If you will be copying and creating a series of Events, i.e., Events that will either reoccur for a specific period of time or the same Event that will take place on different dates in different locations, then it is recommended to create the initial event to be copied and hold off on Publishing it until all Event copies have been generated.
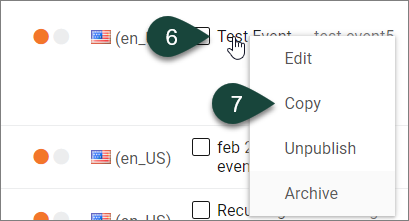
- Right-click on the Event Tile in the list of Matching Results.
- Select Copy from the list of options.
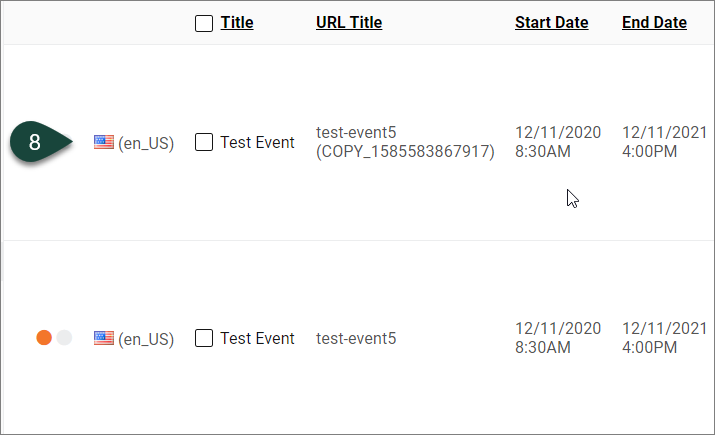
- The “Copy” Event content will appear in the list of Matching Results above the “original” Event content. Select the “Copy” Event Title to open it.
NOTE: The copied event will show the word “COPY” in the URL Title field.
Event Publishing Buttons
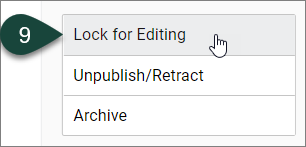
- Select the Lock for Editing button. This enables locking the new event for editing so only you have access to it.
Event Content Tab
SPECIAL NOTE: All the content from the original event has been be copied to this new event. If all the same information still applies, then only update content in Steps 10 (Title field), 11 (URL Title field), 24 (Start Date field) and 27 (End Date field). Then, skip to Step 50 to complete the publishing process for the new event.
- REQUIRED FIELD: Insert the new event name text in the Title field.
TIP: If your event is part of series where each event will take place at a different location, and will feature the same name for all events, it is a good idea to include a place reference in the title to help distinguish these events on your calendar feed. For example, “Placemaking and Public Engagement Workshop – Lansing.”
TIP 2: If your event is part of a course series and you want to post an event for each class in the course, and will feature the same name for all events, it is a good idea to include a class number in the title to help distinguish these events on your calendar feed. For example, “Citizen Planner Macomb County – Class 1.”
TIP 3: If the event is a reoccurring one-time event offered several times per year, and will feature the same title for all events, then insert a hyphen (-) followed by the month and day. For example, “Family Yoga – June 10.”
- REQUIRED FIELD: Edit the URL Title by removing the “(COPY_...)” text and inserting the new event Title-related text.
Before Editing
After Editing
NOTE: If you receive the following error message it means an event in dotCMS already has this same URL Title and you will need to insert a different, unique URL Title instead.
- REQUIRED FIELD: Edit the short Summary for the new event, as needed.
TIP: The text for the Summary should be the first sentence or two of your event description.
NOTE: This information will appear only in the Event feed on your website. It will not appear on the main Event page.
- OPTIONAL: Upload a new image or replace the image from the event that was copied, as needed, using the Browse button.
- If you select the Browse button, from the Select a file window, navigate to the Uploads Images folder on your site.
- Either select an image that was previously uploaded from the Images folder or select the Upload New File button to upload a new image.
- If you selected the Upload New File button, Select file(s) to upload button and navigate to where the image file resides on your computer, and choose the file and select Open.
- Select Save and Publish button only.
NOTE: DO NOT select the Save button. This will only save your image to the back end of your website and it will not appear live when you publish the Event. By selecting Save and Publish for the image you are preparing the image for publishing live for the Event. It will not appear on your page until you Publish the Event.
- Select Execute.
- OPTIONAL: If you uploaded an image in Step 13, you must enter an Image Description for web accessibility purposes. If an Image description from the “copied” event appears in this field, then remove this text before entering the new Image Description text. This needs to be written in sentence format with punctuation and is typically a basic, not detailed, description.
- OPTIONAL: If you uploaded an image in Step 13, you can choose to enter an Image Caption to appear below the image. If an Image description from the “copied” event appears in this field, then remove this text before entering the new Image Description text or keep this field blank if an Image Caption is not needed.
TIP: If your photo needs to include attribution to the photographer, this is a great place to add a sentence like “Photo courtesy of…”
- Image Crop Preview: If you uploaded an image in Step 13, this field will show you what an automatically cropped version of the image will look like for 3:2 Horizontal Image and Square Image crops. However, if you upload custom crops for each of these fields in the next two steps below, then these preview images will no longer show in this field.
- OPTIONAL: This field is for uploading a 3:2 (ratio 3 wide by 2 tall) ratio Horizontal Image that is a resized custom crop of the primary image for use on social media and search engines. Select the Browse button to upload or replace the Horizontal Image, as needed.
NOTE: You will still need to upload the original sized image in the Image field in Step 13.
- OPTIONAL: This field is for uploading a Square Image (1 wide by 1 tall) that is a resized custom crop of the primary image. For headshot images this will ensure that the photo showing on the Event posting and any feeds won’t cut off, or partially cut off, the person’s head from the image space. Select the Browse button to upload or replace the Square Image, as needed.
NOTE: You will still need to upload the original sized image in the Image field in Step 13.
- REQUIRED FIELD: Select the new Start Date of the event.
- If you know both the start AND end times for the new event, select the new Start Time from the dropdown menu, as needed. If you only know the Start Time for the new event, skip this field.
- OPTIONAL: Enter the Start Time of the new event in the Time text box if you ONLY know the Start Time for the event.
TIP: If you do know both the start and end time for your event, leave this field blank and follow Steps 25 and 28.
TIP 2: This field can be used to share additional time-related information, such as “Registration starts at…”
- REQUIRED FIELD: Select the End Date of the new Event, as needed. If it is a single day event, leave the End Date the same as the Start Date. If it is a multiday event, change the End Date to the appropriate date.
- If you know the End Time for the new event, select the new time from the dropdown menu. If you do not know the End Time for your event, and you need to clear out the Start Time and End Time entries from the “copied” event, then duplicate the Start Time entry in the End Time field as well.
- The “Repeat” function is broken in dotCMS. You will need to make a copy of an event and edit it for each repeating event occurrence.
- OPTIONAL: Enter the new Location of the new event, as needed.
TIP 1: Include the street address, city, state and zip code for the event location, as this is may be the only place the address for the event will be listed on the web page. Also, if you know the place name of the event location, such as business or building name, and/or the room number where the event will be held, type in the information in this field. For example, Marriott Hotel, 552 W. Circle Drive, Room 101, East Lansing, MI 48823.
TIP 2: If the new event is virtual, i.e., a web/online meeting, webinar, etc., replace the street address text with the virtual meeting text in this field. For example, Zoom Meeting. You can also include the web address for the virtual meeting in this field if the meeting is public.
- OPTIONAL: Enter the new Geolocation of the new event, as needed. Include the street address, city, state and zip code. This should search the available places so you can select the correct one from the available search results.
TIP 1: This field is important to fill in if you know this information, as it will show a “Get Directions” button when the event is published live that visitors can select to map the location using their GPS.
TIP 2: If the new event is virtual/online, then skip this field.
- OPTIONAL: Enter the new Contact Information for the new event, as needed. If the new event does not have Contact Information, then remove any text from this field.
TIP 1: If you have a generic and/or main office email address and phone number as contact information, type in this information in this field. For example, abc@msu.edu, XXX-XXX-XXXX.
TIP 2: If someone from your person directory is the Point of Contact for this event, and their office email address and phone number will be used as contact information, then type in their name as it appears on their profile. For example, Jane Smith. Their name will then by automatically linked to their profile when the event is Published. You will also need to create a Relationship to them as a Person: Child (Point-OfContact). When the event publishes live, their directory information (Photo, Name, Title, Email Address and Phone Number) will appear under a Related People heading at the bottom of the Event page.
- REQUIRED: Use the WYSIWYG Editor (Description) ) to enter all of the details for the new event, as needed. Should include known details, such as focus of event, speakers, the agenda, cost to attend, continuing education, lodging, parking, etc.
TIP: You should always include some information in the description, so visitors will know what the event is about.
- OPTIONAL: If using a registration system or have a web address (can be also be a link for a PDF form) for the new event, insert the new Registration Link in this field, as needed. If not, and a link is showing in this field for the “copied” event, then clear this field.
NOTE: This is not a text field.
TIP 1: This field is important to fill in if you know the web address information, as it will show a “Register” button when your event is published live that visitors can select to take them to this specific web page or PDF posted online.
TIP 2: If you want to include a web address from another website for more information, such as a conference website URL, you should reference this information in the Description field above using descriptive sentence text that you then hyperlink with the conference website URL. For example, For more information, visit Planning Conference.
Event Relationships Tab
SPECIAL NOTE: All the content from the original event has been be copied to this new event. If all the same information still applies, skip this section.
- Select the Relationships Tab at the top of the screen. This tab enables you to create, select and remove Relationships specific to the new event, as needed. There are four types of relationships that can be applied: 1) Place, 2) Organization, 3) Dataset and 4) Person (Point of Contact).
- A Place is a targeted and select physical building or outdoor location, e.g., Dunbar Forest, related to the College of Agriculture and Natural Resources, includes off-campus places.
- An Organization is a unit that is a college, department or institute. MSU Extension (main website) is considered an Organization.
- A Dataset is a unit or group that is an academic or Extension program, an Extension county website or an Extension topic website. These are typically sub-sites of Organization websites. For example, MSU Extension is the main organization site and all Extension sub-sites are datasets of that main site.
- A Person (Point of Contact) is someone with a Person profile saved within your website that you want to feature as a point of contact for your event. When the event is published, this person’s name, title, phone, number and photo will appear on the event web page as “Related People,” and their name will appear in the Contact field from the Content tab, which will also be hyperlinked to their Profile page.
NOTE: More than one Point of Contact may be selected for an event.
NOTE 2: There may be times when you may select for both an Organization and a Dataset relationship for an event. For example, Construction Management is an academic program within the School of Planning, Design and Construction. If this is a Construction Management-related event, then you would make the Dataset relationship for the program, as well as Organization relationship for the school. This is only possible for websites for which you have access. You are not able to make relationships to units for which you don’t have access.
NOTE 3: For MSU Extension events only, there is an Event Submission Form outside of dotCMS that allows for making relationship to sites you don’t have access to, i.e., relating an event to all county websites, so you can promote your event statewide. This form is available to use online at MSU Extension Event Submission Form.
- OPTIONAL: To apply any new Relationships for this event, as needed, select the Relate button connect the appropriate relationship type.
- If a new Relationship was selected in Step 36, then in the Search window that opens, under Title field, type in the name of the relationship you want to make, i.e., the name of your unit (for Organizations and Datasets) or the name of the person for Point of Contact.
NOTE: Ignore the Language field as it defaults to the English language.
- Scroll to the bottom of the Search screen and select the Search button.
- From the Matching Results that appear, select the check box next to the most appropriate result.
- Select the Relate button and the relationship will appear.
- To remove a Relationships that does not apply to the new event, select the Trash Can symbol next to the Relationship and it will be removed.
Event Tags Tab
SPECIAL NOTE: All the content from the original event has been be copied to this new event. If all the same information still applies, skip this section.
- Select the Tags Tab at the top of the screen. This tab enables you to create, select and remove Tags specific to the new event, as needed.
NOTE: When your event is Published, the tags will appear at the bottom of the Event page and will be clickable. If you select one of these tags a web page will open that displays all content related to that specific tag from across all the college’s websites.
- If you want to input a new Tag(s) for the new event, put your cursor in the Tags field and start typing the name of the Tag you would like to use.
TIP: It is better to use tags that are targeted and strategic, rather than a lot of single word tags. For example, “dotcms training” is a better tag to use than the words “dotcms,” “website” or “training.”
- If a pre-set tag appears, you can select it.
- The Tag will now appear in the Tags field.
- If a pre-set tag does not appear for the text you have typed, select the Enter key on your keyboard.
- The new Tag will appear and have the outlined box showing around it like in Step 45.
NOTE: This new tag will go live as soon as you Publish the Event, and you will be able to select for it in the future.
- To remove Tag(s) you do not want to include with the new event, select the “x” within the applied tag and it will be removed.
Event Final Steps
- The English language is the default for digital documents. You can skip this field.
- If you select the Check Links button, it will enable you to check the links in the new event posting to make sure they work.
- If you select the Save Draft button, it will save the new event to the backend of dotCMS so you can still work on it before publishing it live.
- If you select the Publish button, it will publish the new event so it will appear live on your site.