How to Create an Event in dotCMS
 Print
Print Email
EmailLearn how to create an event in dotCMS.

- Log into dotCMS.
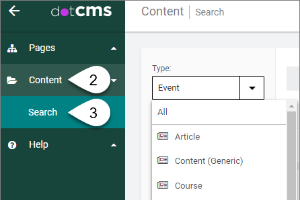
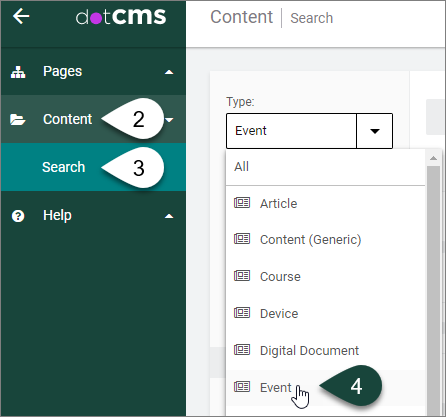
- Select Content on the left side of the screen.
- Select Search.
Content Dashboard
- Select Event from the Type drop-down menu.
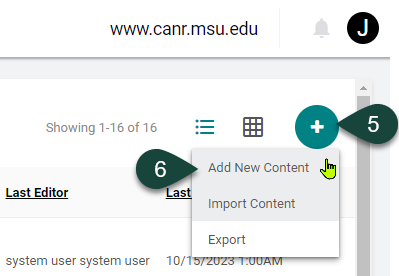
- Select the Circled Plus sign (+) on the top right side of the screen to add New Content button.
- Select Add New Content.
(Event) - Content Tab
NOTE: Above most fields in the Content tab is Hint Text that further explains the field. It is recommended to read this information prior to filing in a particular field.
- Host - REQUIRED FIELD: Open the Host drop-down menu.
- Select the Plus Sign (+) to twirl open www.canr.msu.edu.
- Select the Folder of the site where you want to save your event.
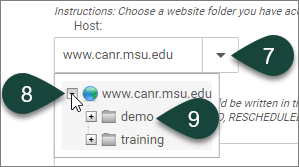
TIP: If you forget to select your folder for the Host, when you attempt to publish your event you will receive an error stating “You don't have the required permissions to save the asset. User has no Add Children Permissions on selected host.” Do not close the event, follow the steps above and republish your event. It should publish properly this time.
- Title - REQUIRED FIELD: Enter the Title of the event.
NOTE: It is a best practice to add an event to the calendar as soon as you have identified a program name, date and location. You do not need all the details (e.g., registration link, complete program details) finalized to post the event on a website; you may add those details at a later date. This is more of a save-the-date approach.
TIP 1: If your event is part of series where each event will focus on a different topic and/or take place at a different location, and will feature the same name for all events, it is a good idea to include a date or place reference in the title to help distinguish these events on your calendar feed. For example, “Placemaking and Public Engagement Workshop – April 15” or “Placemaking and Public Engagement Workshop – Lansing.”
TIP 2: If your event is part of a series that can be joined at any time (no prior attendance required), each occurrence of the series should be posted as its own event. When posting each event, it is a good idea to include either the date or a class number in the title along with the series name to help distinguish these events on your calendar feed. For example, “Citizen Planner Macomb County – Class 1.”
TIP 3: When posting a series of related events, consider reviewing the “How to Copy an Event in dotCMS” documentation (short version and long version) once you have successfully posted your first event using this tutorial.
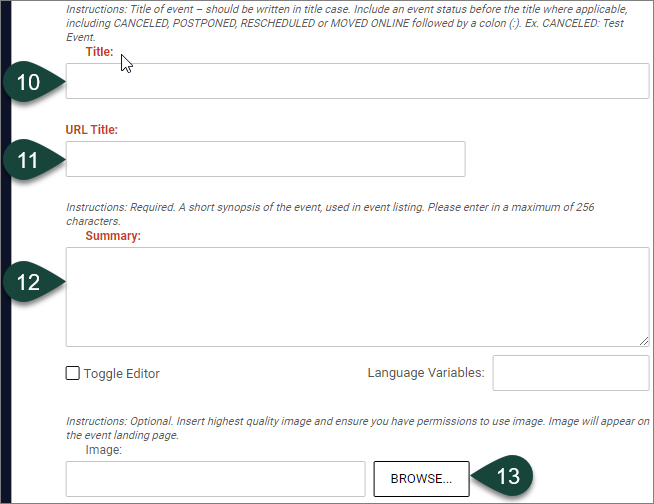
- URL Title - REQUIRED FIELD: The URL Title will fill in automatically; however, you may change this if you so desire.
NOTE 1: If there is already an event in the system with the same URL Title, then you will need to create a unique URL Title. Otherwise, when you try to save the event, you will receive an error that an event already exists in the system with that same URL Title. For example, if an event in the system has a URL title of canr.msu.edu/events/yoga-class, then you would need to change the URL Title to something different like canr.msu.edu/events/yoga-class-april-15.
NOTE 2: URL titles must not contain any spaces and should include hyphens (-) between the words. For example, yoga-class-april-15.
- Summary - REQUIRED FIELD: Enter a short Summary for the event using a maximum of 256 characters.
NOTE 1: This information will appear only in the Event feed on your website or in search results. It will not appear in the content of your main Event page.
NOTE 2: You may ignore the Toggle Editor and Language Variable fields whenever you see them listed below a text box.
- Image - OPTIONAL FIELD: Upload an image for the event using the Browse button.
NOTE: If you do not plan to add an image to your event, skip to step 24.
- If you select the Browse button, from the Select a file window, navigate to the site folder that you selected for the Host field in steps 7-9. Twirl this folder open and you will see a subfolder called “Uploads.” Twirl this open and click on the subfolder titled “Images.”
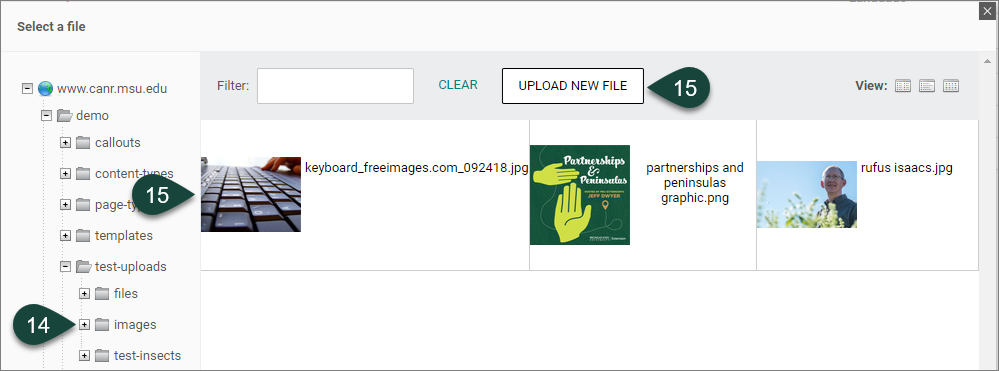
- Either select an image that was previously uploaded to the Images folder or select the Upload New File button to upload a new image.
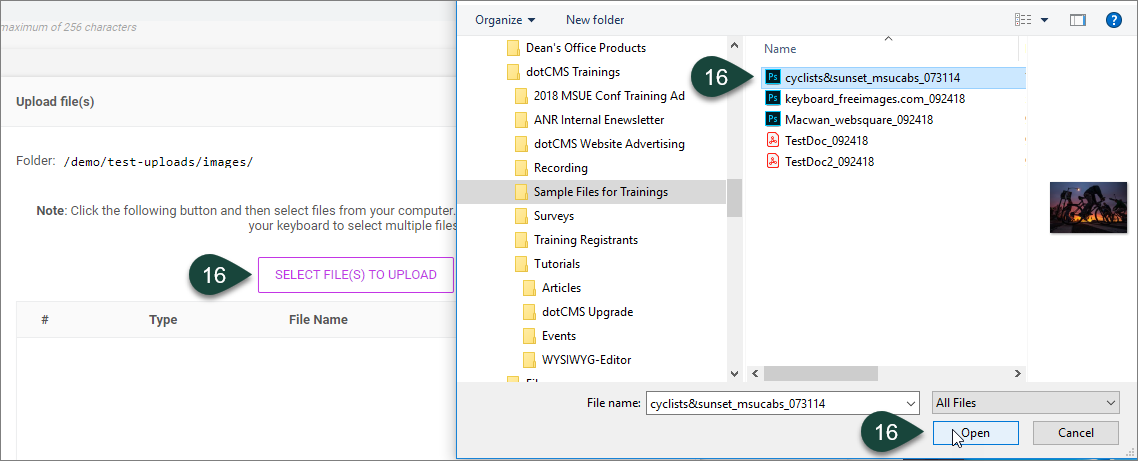
- If you selected the Upload New File button, Select file(s) to upload button and navigate to where the image file resides on your computer, and choose the file and select Open.
- From the drop-up menu, select the Save/Publish button only.
NOTE: DO NOT select the Save Draft button. This will only save the image to the backend of the website and it will not appear live when you publish the Event. By selecting Save/Publish for the image, you are preparing the image for publishing live for the Event. It will not appear on the page until you Publish the Event.
- Select the Execute button.

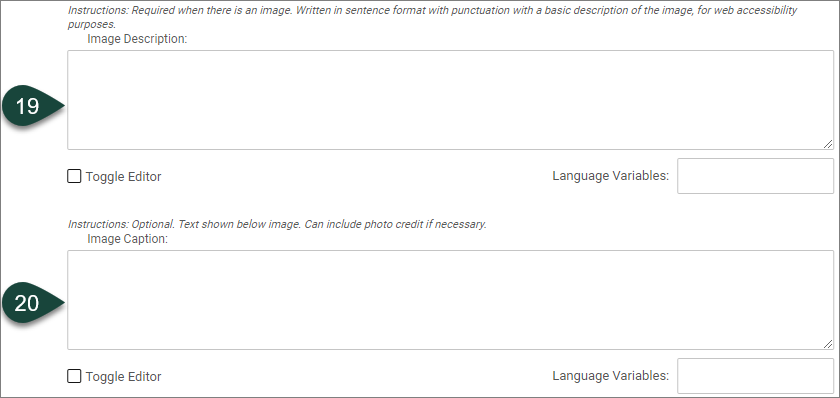
- Image Description - OPTIONAL FIELD: If you uploaded an image in step 13, you must enter an Image Description for web accessibility purposes, such as for use with assistive technology tools. The description needs to be written in sentence format with punctuation and is typically a basic, not detailed, description. For example, Person holding a bouquet of flowers.
- Image Caption - OPTIONAL FIELD: If you uploaded an image in step 13, you can choose to enter an Image Caption to appear below the image on the event page.
TIP: If your photo needs to include attribution to the photographer, this is a great place to add a sentence like “Photo courtesy of …” or "Photo by …"
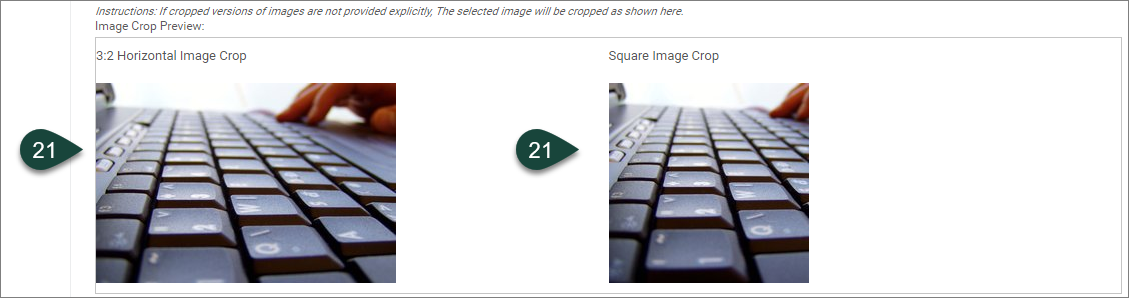
- Image Crop Preview: If you uploaded an image in step 13, this field will show you what an automatically cropped version of the image will look like for 3:2 Horizontal Image and Square Image crops. However, if you upload custom crops in each of these fields in the next two steps, then these preview images will no longer show in this field.
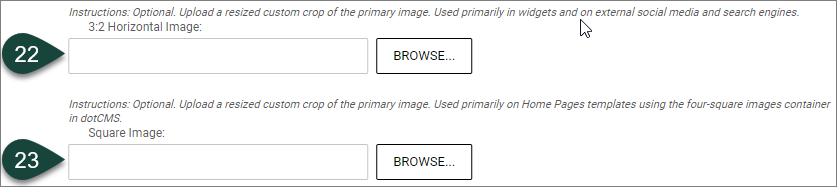
- 3:2 Horizontal Image - OPTIONAL FIELD: This field is for uploading a 3:2 (ratio 3 wide by 2 tall) ratio Horizontal Image that is a resized custom crop of the primary image for use on social media and search engines. This feature is available if the dotCMS automatic crop is not ideal. To add the photo, select the Browse button and follow the same process outlined in steps 14-18.
NOTE: You will still need to upload the original sized image in the Image field in step 13.
- Square Image - OPTIONAL FIELD: This field is for uploading a Square Image (1 wide by 1 tall) that is a resized custom crop of the primary image. This feature is available if the dotCMS automatic crop is not ideal. For headshot images this will ensure that the photo showing on the Event posting and any feeds won’t cut off, or partially cut off, the person’s head from the image space. To add the photo, select the Browse button and follow the same process outlined in steps 14-18.NOTE: You will still need to upload the original sized image in the Image field in step 13.
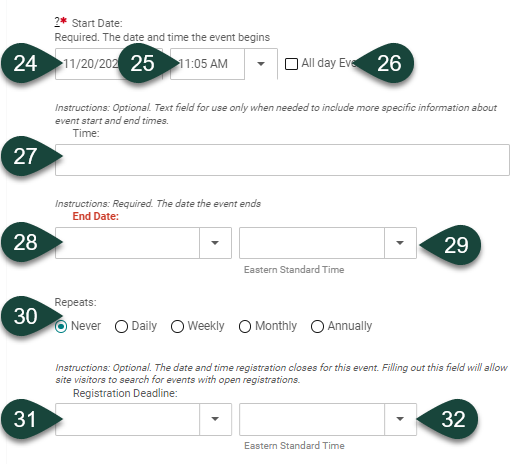
- Start Date - REQUIRED FIELD: Select the drop-down menu for the Start Date field and choose the Start Date for the event.
- If you know both the start AND end times for the event, select the Start Time from the drop-down menu.
- If the event is an all day event, select the All Day Event Checkbox.
-
Time - OPTIONAL FIELD: Use the Time field if you ONLY know the start time for the event, and enter the time of the event in the text box, or if a specific time zone should be indicated like EST.
TIP 1: If you do know BOTH the start and end time for the event, leave this field blank and follow steps 25 and 29.
TIP 2: This field can be used to share additional time-related information, such as “Registration starts at…”
- End Date - REQUIRED FIELD: This field auto populates with the Start Date assuming the event is a one-day event. If it is a single day event, leave the End Date the same as the Start Date. If it is a multiday event, change the End Date to the appropriate date by selecting the drop-down menu for the End Date field and choosing the End Date for the Event.
- If you know the End Time for the event, select the time from the drop-down menu.
- Repeats - OPTIONAL FIELD. THIS FIELD DOES NOT WORK! DO NOT USE THIS FIELD FOR RECURRING/REPEAT EVENTS. For repeating/recurring events, you will have to enter/create an event in dotCMS for each occurrence.
- Registration Deadline Date- OPTIONAL FIELD: Enter the Registration Deadline Date for an event if it has one. If it does not, skip this field.NOTE: If a Registration Deadline date is filled in, then the “Register” button will be hidden after this date and no longer show on the live event page.
- Registration Deadline Time - OPTIONAL FIELD: Enter the Registration Deadline Time for an event if it has one. If it does not, skip this field.
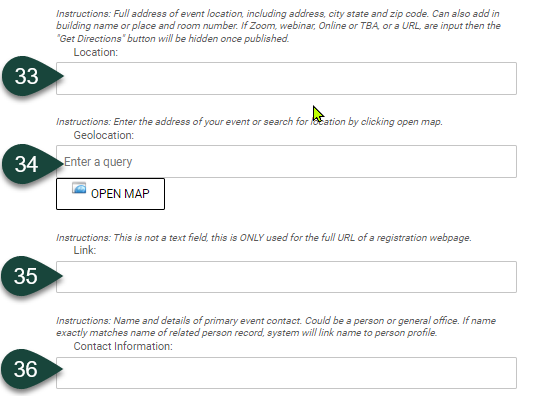
- Location - OPTIONAL FIELD: Enter the Location of the event.
NOTE: If you fill in a physical address in this field, a “Get Directions” button will show when your event is published live that visitors can select to map the event location using Google Maps. It is highly recommended to check that the address information is accurate for Google Maps from the live event to make sure it’s directing people to the correct event location. If it does not, update the street address information in this field accordingly.
TIP 1: Include the street address, city, state and zip code for the location of in-person events, as this may be the only place the address for the event will be listed on the web page. Also, if you know the place name of the event location, such as business or building name, and/or the room number where the event will be held, also type in the information in this field. For example, Marriott Hotel, 552 W. Circle Drive, Room 101, East Lansing, MI 48823.
TIP 2: If the event is virtual or TBA, enter in this information in this field. For example, you can type in the words Zoom, Webinar, Online or TBA. This field also accepts URLs, such as Zoom meeting links. If any of these words or a URL are input into this field, then the “Get Directions” button will be hidden on the published event page as it will not meet the physical address requirements. Use only these words as listed and not a combination of them (e.g. “Zoom Webinar.”) - Geolocation - OPTIONAL FIELD: Enter the Geolocation of the event, e.g., the street address, city, state and zip code. This should search the available places so you can select the correct address from the available search results. Verify you have selected the appropriate location by clicking “Open Map” to view the address on a map.
NOTE: There may be times when you may need to select for a more precise event location related to longitude and latitude for an event location. This field is more accurate at determining that information than the Location field. In those types of instances, you will need to fill in both the Location and Geolocation fields.
TIP 1: This field will also generate a “Get Directions” button like the Location field when your event is published live that visitors can select to map the event location using Google Maps.
TIP 2: If your event is virtual, then skip this field. -
Link - OPTIONAL FIELD: Insert a relevant website registration page hyperlink or web address into the Link field. This could be a registration link from the ANR Events Management System (EMS), Zoom or another website all together.
- Contact Information - OPTIONAL FIELD: Enter the Contact Information for the event.
TIP 1: If you have a generic and/or main office email address and phone number as contact information, type in this information in this field. For example, abc@msu.edu, XXX-XXX-XXXX.
TIP 2: If someone from your person directory is the Point of Contact for this event, and their office email address and phone number will be used as contact information, then type in their name as it appears on their website profile page in this field. For example, Jane Smith. If you relate this person in the Relationships tab of the event entry, their name will be automatically linked to their profile when the event is Published. To make this possible, you will also need to create a Relationship to them as a Point Of Contact (see step X). When the event publishes live, their directory information (Photo, Name, Title, Email Address and Phone Number) will also appear under a Related People heading at the bottom of the Event page. -
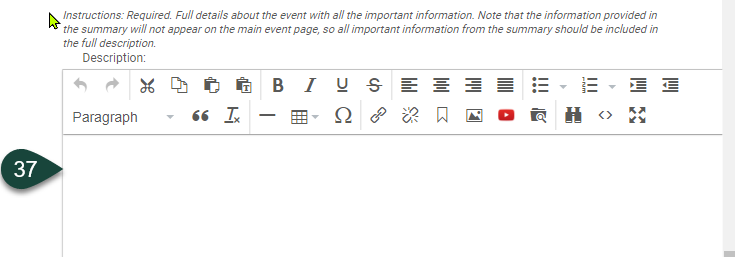
Description - REQUIRED FIELD: Use the Description field’s WYSIWYG Editor to enter all of the details of the event information, including known details, such as focus of event, speakers, the agenda, cost to attend, continuing education credits, lodging, parking, etc.
TIP 1: You should always include some information in the description, so visitors will know what your event is about. Do not rely on information contained in a PDF or an image of a “flyer” as this is neither web accessible nor mobile-friendly.
TIP 2: To ensure the text is correctly formatted, if you copy and paste directly from another website, select the text, and select the Paragraph drop-down menu from the WYSIWYG editor and choose the Paragraph option. This will remove formatting that may come over from another site. If the text in this field looks oddly formatted, this is likely the cause.
(Event) - Tags Tab
All dotCMS websites are now tag-based, which means you need to make use of tags to properly market and promote your event in the College of Agriculture and Natural Resources website.
- Select the Tags Tab at the top of the screen. This tab enables you to select and create tags specific to the event.
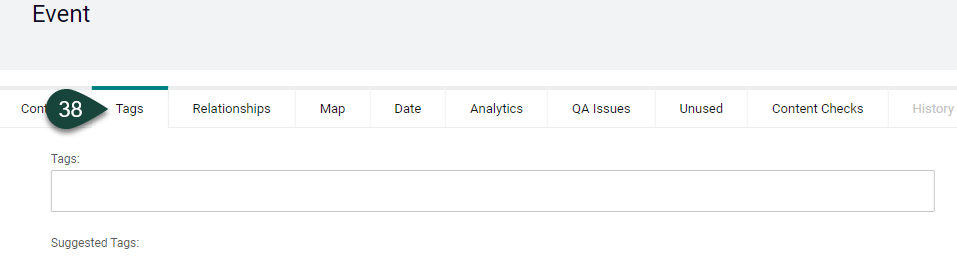 NOTE: When the event is Published, the tags selected on this tab will appear at the bottom of the Event page and will be clickable. If you select one of these tags, a web page will open that displays all content related to that specific tag from across all the college’s websites.
 - To add tags not listed under Suggested Tags, put your cursor in the Tags field and start typing the name of the tag you would like to use.
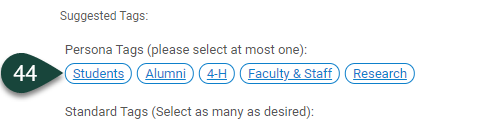
TIP 1: All department, program, institute, center, lab, program and topic sites have pre-set tags in the system that you can type in to select from.
TIP 2: All MSU Extension events should also be tagged “msu extension.”
TIP 3: Tags are not keywords. If you are not sure what tags to use, refer to the Tagging Recommendations article. - If a pre-set tag appears that is appropriate for the event, select it.

- The selected tag will now appear in the Tags field.

- If a pre-set tag does not appear for the text typed and you want to make it a new tag, select the Enter key on your keyboard, or type a comma (,) after the word.

- The new tag will appear in the Tags field and have the outlined box showing around it like in Step 41.
 NOTE: This new tag will go live as soon as the Event is saved or published, and it will be selectable in the future.
 - The Suggested Tags field will display tags that may be relevant based on the event information input from the Content tab and other existing dotCMS tags that might be related. Select any tags that are applicable for the event. This will add the suggested tag to the Tags field.
NOTE: Not all tags listed as suggested will be appropriate and there may be others that you will need type in and select yourself, as explained in the next.
(Event) - Relationships Tab
- Select the Relationships Tab at the top of the screen. OPTIONAL: There are three types of relationships that can be applied: 1) Parent Course (Steps 46-51) 2) Event Location (Steps 52- __) 3) Point of Contact.
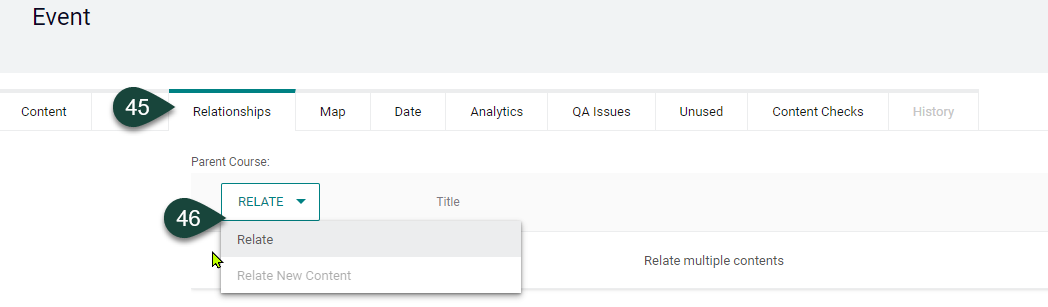
- Parent Course - OPTIONAL FIELD: To apply a Parent Course Relationship, select the Relate. You must have access to the folder in which the Parent Course is stored in order to create a relationship. If you don’t have access to the folder, you can submit a request to add the course for an Event using the Website Change Request Form.
- In the Search window that opens, under Title field, type in the name of the relationship you want to make, i.e., the parent course name.
NOTE: Ignore the Language field as it defaults to the English language.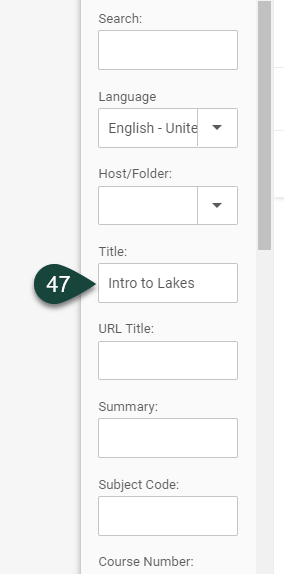
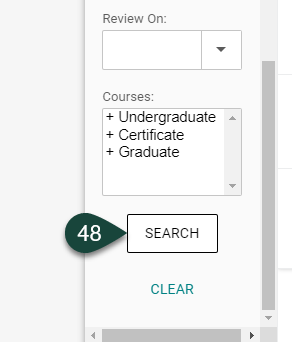
- Scroll to the bottom of the Search screen and select the Search button.
- From the Matching Results that appear, select the check box next to the most appropriate result.
- Select the Relate button and the relationship will appear on the screen.
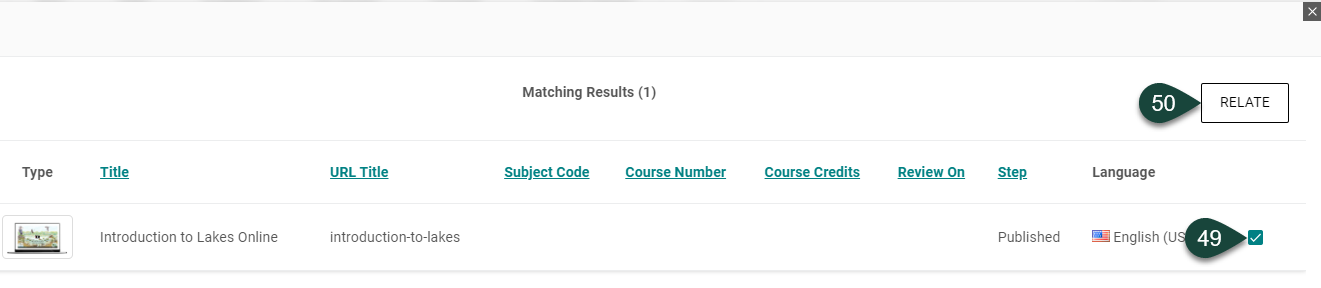
- After you select the Relate button, the relationship will then appear on the screen.

- Event Location - OPTIONAL FILED: To apply an Event Location relationship, use the searchbox in the dropdown below to find a Place contentlet, and click the Add Event Location button to add it to this content.

NOTE 1: A Place is a targeted and select physical building (like county Extension offices) or outdoor location (like Dunbar Forest) related to the College of Agriculture and Natural Resources and include off-campus locations. These locations are already set up within dotCMS. The Place relationship should only be used if the event is being housed at that type of location.
NOTE 2: For events being hosted at MSU Extension locations, Event Location relationships may be selected, if applicable. - Once you select the Add Event Location button, then the Place will appear in the box below.

- Point of Contact - OPTIONAL FIELD: A Point of Contact is someone with a Person profile saved within a dotCMS website folder that can be featured as a point of contact for an event. When the event is published, information from this person’s profile such as their name, title, email address, phone number and photo will appear on the event web page under the “Related People” heading. And if their name appears in the Contact Information field from the Content tab, their name will also be hyperlinked to their Profile page in that field.

NOTE: Most events will need at least one Point of Contact relationship to be made unless the event contact does not have a profile in dotCMS or it is a main office email or phone number.
Once you select the Add Point of Contact button, then the person's name will appear in the box below.
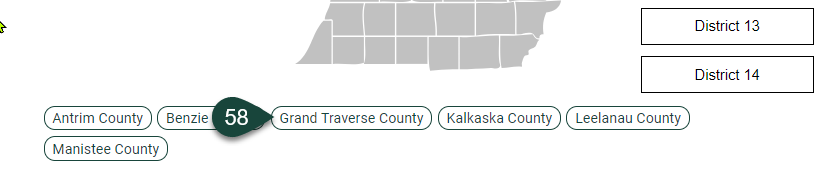
(Event) - Map Tab
- If this is an MSU Extension event, select the Map tab at the top of the screen. If this is a non-MSU Extension event, skip this tab.
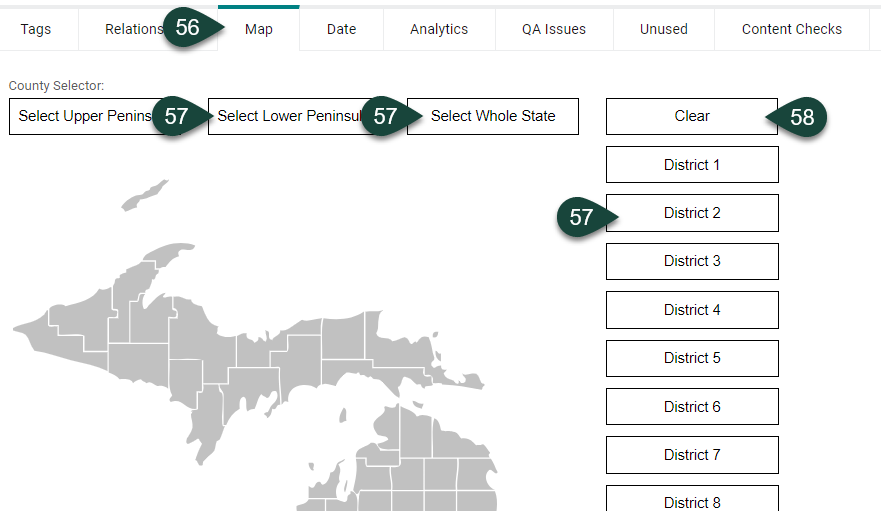
- Select the County(ies) where you would like to promote this event. This can include the Whole state, Upper or Lower Peninsula, one or more districts, or an individual county(ies) for the event.
TIP: For statewide virtual events, select the entire state. - If there is a County(ies) or area of the map that should be removed as a relationship, select the Clear button or the name of an individual county. Repeat this process, as needed, if removing individual counties.
(Event) - Date Tab
NOTE: There is no specific action you need to take in this tab. This information is strictly informative.
- OPTIONAL: Select the Date Tab at the top of the screen.
- Once you have selected a Start Date for the event, the System Expiration Date will automatically be set for one month after the event End Date occurs. This is the only field you need to pay attention to on this tab.
NOTE: The System Expiration Date function will unpublish the event so that it is no longer live and searchable online.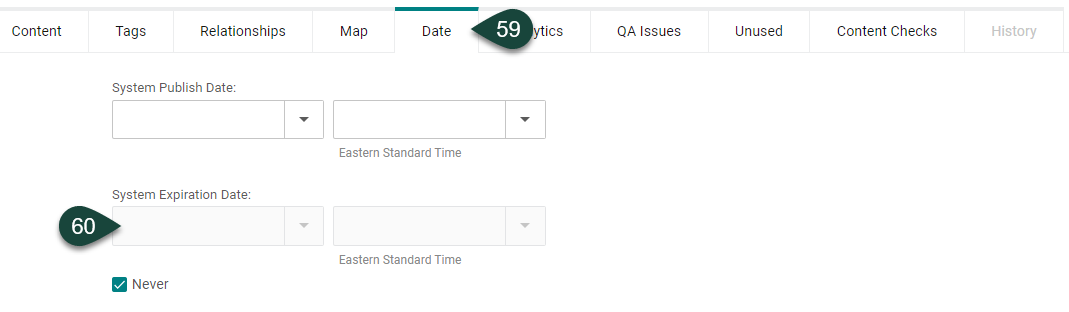
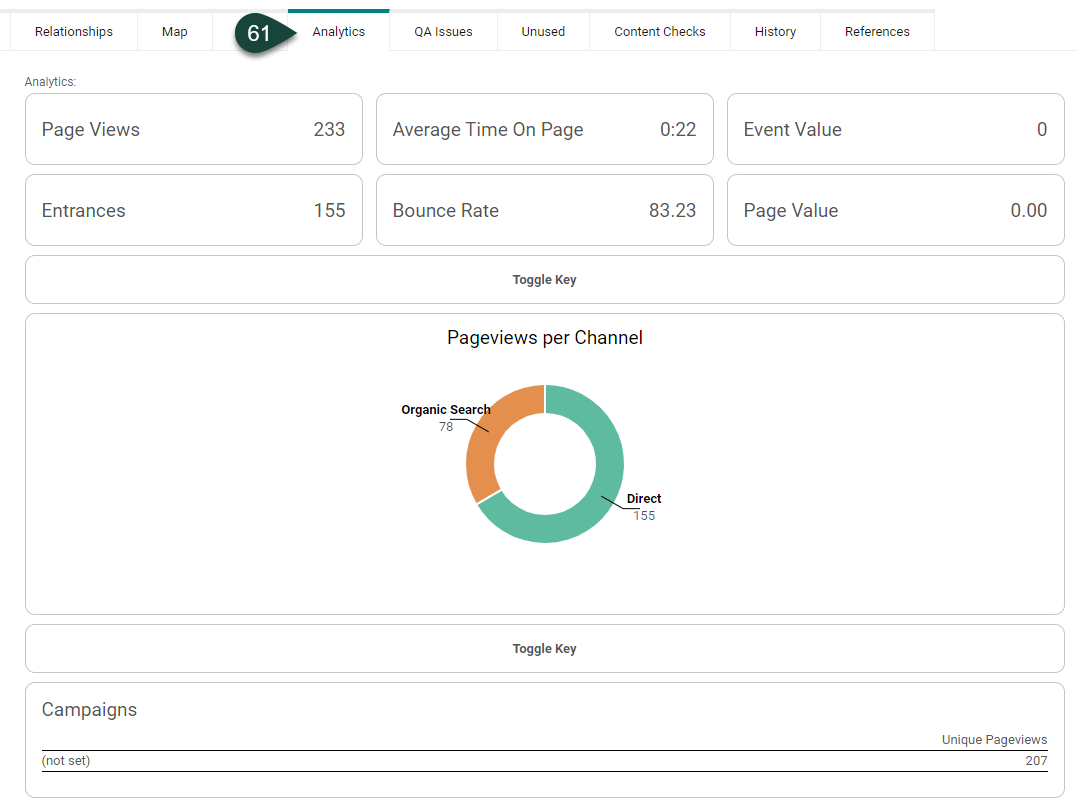
(Event) - Analytics Tab
NOTE: Until a new Event is published this tab will remain empty. After an Event is published, then this tab can show analytics generated by Google Analytics, including Page Views, Average Time on Page, Event Value, Entrances, Bounce Rate and Page Value. It may also show Pageviews per Channel like Email, Direct, etc. If Google Campaign URL Builder tracking links are created for this event, then analytics for that content will also appear under the Campaigns heading.
- OPTIONAL: Select the Analytics Tab at the top of the screen.
(Event) - QA Issues Tab
- This tab displays any QA issues that may pertain to your Event. If applicable, read through the list of issues and try to fix these problems. Most of the time, this information is strictly informative.

(Event) - Unused Tab
- This tab displays extra unused fields. You can disregard this tab altogether.

(Event) - Content Checks Tab
- You can disregard this tab altogether.

(Event) - History Tab
NOTE: This tab is greyed out when a new event is being created. It will appear selectable if an event is opened in dotCMS for editing after it has been published. This tab is not normally used for typical event postings. This information is provided as a point of reference and it is likely that no action is needed on this tab.
- History Tab - OPTIONAL: Select the History Tab at the top of the screen.
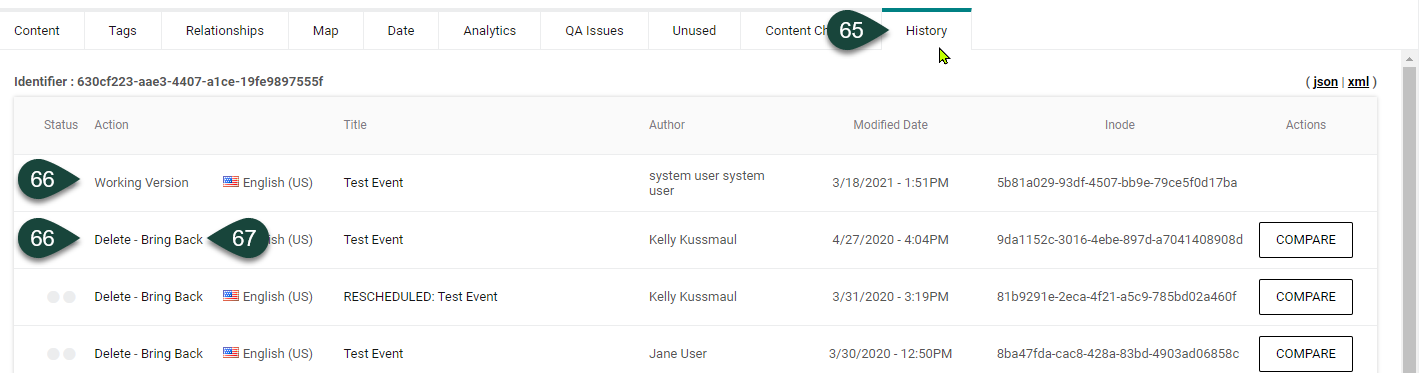
- This is where “Working” (or edited) and “Bring Back” (original or previous) versions of your content will appear if you are editing an event that has previously been published or saved. If you publish edits to the original version of your content, you will be able to bring it back and republish it as needed.
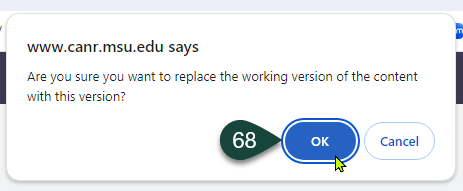
- To revert your content to a previous or original version, select the text “Bring back.”
- Select the OK button when the question prompt window appears.
Event Final Steps
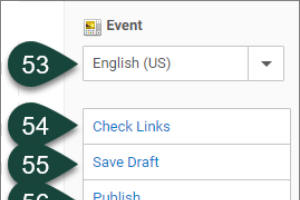
- The English language is the default language. Skip this field.
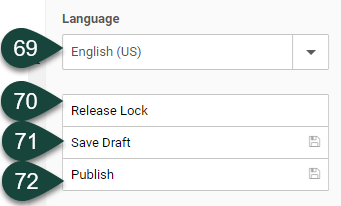
- If the Release Lock button is selected, it will unlock the event to the backend of dotCMS so other dotcms users can edit the event.
- If the Save Draft button is selected, it will save the event to the backend of dotCMS so you can still work on it before publishing it live.
- If the Publish button is selected, it will publish the event so it will appear live on your site.
TIP: As a best practice, it is a good idea to check the event on the live site after it has been published to make sure everything looks okay. To easily find the newly published event, go to a second/different browser that you are NOT logged into for dotCMS and type or paste in canr.msu.edu/events/INSERT EVENT URL TITLE TEXT from step 11. For example, if you are logged into dotCMS via the Chrome browser, select a different browser from your computer (like Firefox, Safari, Edge) to view the event live on a website. If you attempt to open the event URL using the browser you are logged into, it will open the event within the dotCMS system instead, which won’t give you the live view that you are looking for.