Invest in next year’s harvest this fall by sampling for nematodes ahead of vegetables
 Print
Print Email
EmailTips for sampling fields for nematodes to plan next year’s vegetable rotation.
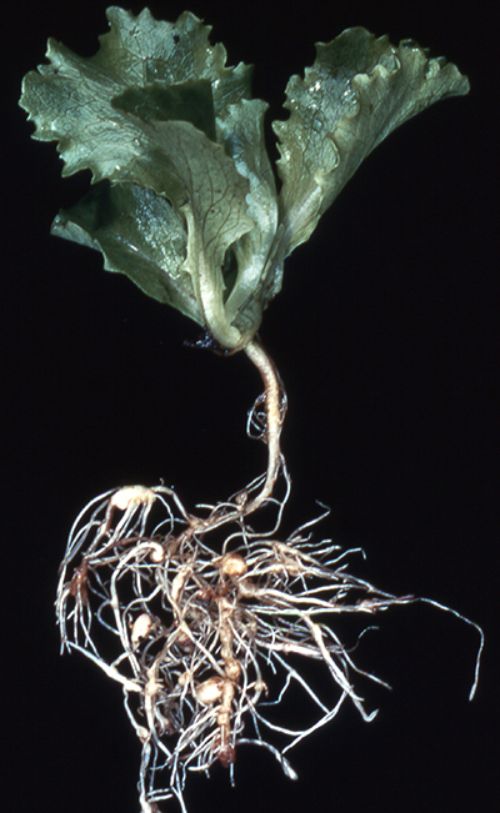
All vegetable crops grown in Michigan are hosts for plant-parasitic nematodes, but some of these crops, such as carrots, are especially susceptible. Sampling soil ahead of next year’s vegetables can help you avoid planting into problem fields, target specific areas for fall or spring treatment and adjust your crop rotation. Michigan State University Extension offers some pointers to help you collect a good sample that provides useful information.
Sample at the right time
Samples can be taken any time before the ground freezes in fall or after it thaws in spring. However, the best timing can vary somewhat based on the types of nematodes present. For example, northern root knot nematodes overwinter as eggs but the eggs are often lost during extraction from the soil. Consequently, if you wait too long in the fall (after Thanksgiving in Michigan) or sample very early in the spring, a large percentage of root knot nematodes could be in the egg stage and not detectable via standard methods. In these situations a bioassay can be used to detect nematodes, but this will delay results by a month.
Get the right equipment
You will need a soil probe or shovel, a bucket or large plastic bag, a sealable container for the final samples, a marker to label the final sample bags, and a submittal form from MSU Diagnostic Services.
Identify areas at low and high risk for problems and take separate samples from these areas
Just like gridded soil sampling can be used for precision fertilizer applications that target problem areas, taking separate samples from low and high risk areas could help you target specific parts of fields for treatment, or to avoid them entirely. High risk areas could include areas where you remember having problems in the past, such as a corner of a field where carrots are always forked. Potential problem areas also include parts of fields that had a nematode host plant the previous year. This could include sections of field planted with a host-crop or that contain weedy hosts. For example, although corn plants (and all grasses) are non-hosts for northern root-knot nematodes, patches of broadleaf weeds (which are hosts) could still support this pest. If you plant carrots following corn, areas that had broadleaf weeds last year may be at higher risk for problems this year.
Be intentional about where you sample
Before you start taking soil cores, take a second to assess a walking path that will distribute your samples throughout the field. This is important because nematode problems are often patchy. For example, if plant-parasitic nematode populations are very high in the field’s northeast corner, and you only sample the southwest, your sample could come back with results falsely suggesting a minimal risk for problems.
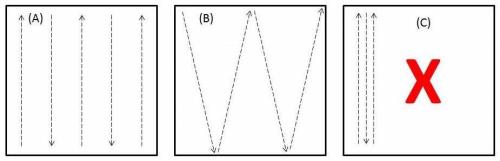
Walk a path that allows you to take subsamples throughout an area. (A) and (B) represent good potential walking paths, (C) does not.
Take enough samples to capture in-field variability and mix thoroughly
Take 20-50 subsamples of soil to about 8 inches of depth and combine them into a single container. Once you collect enough, mix the subsamples thoroughly with your hands or by shaking the container.
Take a small amount of mixed soil for the final sample and place it into a clearly labelled, sealable container
Take 1 pint to 1 quart of soil from the mixed sample and put it into a smaller container. Extremely dry samples mean dead nematodes, so use sealable containers such as zippered plastic bags or any other container that conserves moisture. Do not overfill bags; if you fill zip locks to capacity, they are more likely to burst open during shipping, mixing soil from different samples. Avoid paper bags as they become wet and usually fall apart. Label the sample container with water-resistant writing and an identifier that matches what you put on the sample form.
Prior to sending the sample to the lab, store your nematodes in a cool place
When in the field, do not place nematode samples on your dash or in the trunk or truck bed. They will cook and nematodes will die. A Styrofoam cooler with cold packs can keep them at appropriate temperatures. Samples can also be stored in the refrigerator – not the freezer – until you ship them.
Fill out the sample form completely
Make sure to include rotational history, observed symptoms and complete contact information. Provide an email address or fax to receive results quickly.
Ship it to the diagnostic lab so it arrives before Friday
This will help ensure your sample does not sit on a hot loading dock over the weekend.
Get in touch with an expert to help you interpret the sample results
Different plant-parasitic nematodes are managed differently. Seek out someone who can assist in the interpretation of your test results to help you make informed management decisions.
Following these steps will increase your chances of getting meaningful and useful results you can translate into effective management.
This article originally appeared in the June 2015 issue of Vegetable Growers News.