Propagating Jack-in-the-pulpit
 Print
Print Email
EmailMake more of Jack-in-the-pulpit, a beautiful native plant, by following these propagating tips.
Many smart gardeners recognize Jack-in-the-pulpit or Arisaema triphyllum as a wonderful and unusual native plant. Perhaps you already have this fun native plant and are eager to propagate its beauty. You're in luck! For more information on the captivating Jack-in-the-pulpit and how to propagate it, read on.
Important note: Please purchase plants from a reputable plant nursery and do not harvest them from the wild. If you are collecting seeds and propagating them, do so from plants already in your garden. Overharvesting plants from the wild can destroy essential ecosystems.
Not all seeds get the chance to grow into plants, some will die in unfavorable conditions, others may rot, while lucky seeds will be spread by wildlife. With a little help in your garden, you can improve their germination rate and potentially produce dozens of offspring. These perennial plants will return year after year from their corm, which stores nutrients from year to year. Jack-in-the-pulpit grows best in rich, damp soil. They grow in woodlands, boggy areas and stream banks. Enriching shaded soil with additional compost and leaf mold and watering can often create the habitat required for happy Jacks. They also prefer a soil that is acidic to neutral, meaning that if you have heavy clay soil with a high pH, this isn't the plant for you. Not sure what the pH of your soil is? Get a soil test.
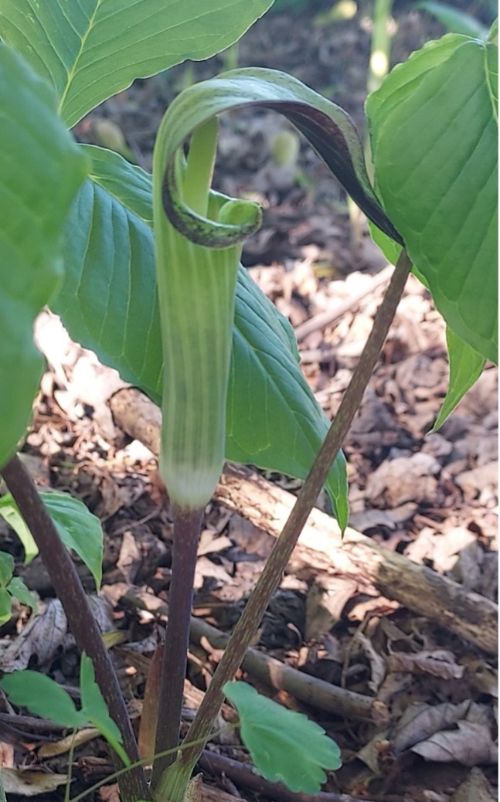
In the spring, a solitary shoot comes from the ground, and on a mature plant, two sets of leaves and a solitary flower bud emerge. Each leaf is made up of three leaflets. The flower is not like any other flower many gardeners have encountered. When the bud scales on the flower open, a leaf-like hood called a spathe forms the pulpit portion. It gently folds over the central cylinder of the flower. Inside the column is the spadix that stands like a solitary column with a rounded top. That's "Jack," which is classified as a spadix. This is a flower shape common to the Araceae family of plants and can be found on peace lily and skunk cabbage. The flower spathe can range from pale green to dark green, and some have maroon and greenish stripes. The entire plant usually grows from 1 to 3 feet tall. Older plants, in the right soil conditions, tend to be on the larger side. The spadix can exhibit male, female, or contain both male and female traits.
After the flower is pollinated and the spathe withers, a small, cylindrical cluster of green berries forms. As the growing season moves along, the berries grow. The green berries become orange in August or early September and continue to ripen to a brilliant red. The berries will be below one of the leaves. Leaves may deteriorate, but the berry cluster is an eye-catcher. This is the time to propagate your plant. Berries should be bright red and a bit soft.
Jack-in-the-pulpit can have some similar features to Arum italicum, which is a non-native and potentially invasive plant. Be sure that you have the correct plant before propagating its seeds.
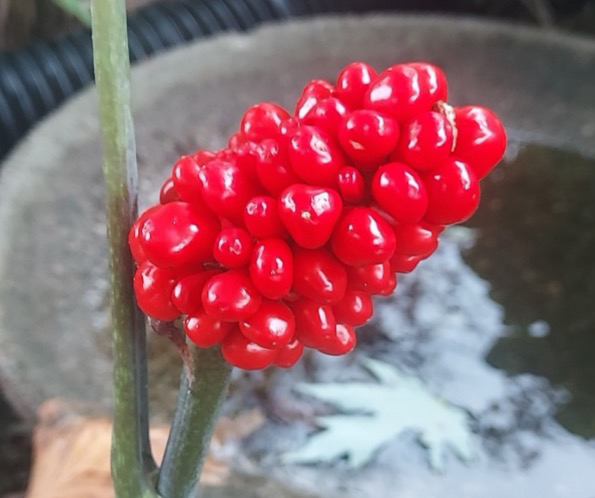
Once the berries have turned red, use scissors or small pruning shears to cut the berry cluster free from the plant. The juice can be highly irritating to many people's skins, so wear moisture-proof gloves. The berries are poisonous. Be cautious, do not eat while processing the seeds, and make sure to wash your hands carefully after handling them. Each berry can contain up to five seeds. You can either direct sow these seeds, germinate them indoors, or winter sow them in containers. If you are saving the seeds, make sure to refrigerate them. These seeds require up to three months of cold stratification before they can germinate.
The simplest method is to sow the seeds immediately after harvest. Start by lightly raking or scratching up an area close to the parent plant or one with suitable planting conditions. Deposit the seeds on the soil surface. Then, lightly sprinkle a thin layer of soil over the seeds and water them to hold them in place. Use a light coating of leaf mulch over the area, about 1 inch deep. Make sure the soil is damp until the ground freezes. Mother Nature will take care of a season of cold stratification, and the seeds will grow in the spring.
These seeds will not germinate unless they are cold-stratified. Cold stratification is a process for mimicking cold winter temperatures. One way to do this is to take clean seeds and mix them with damp, whole-fiber sphagnum moss in a sealed plastic bag. They can then be refrigerated for 60-90 days. After this period, plant them in a container of soilless potting medium with seeds buried no deeper than 0.25 inches. Keep them damp, and germination will begin in about two to three weeks. These seedlings can then be hardened off and planted outside.
As you embark on your propagation journey, remember that gardening is not just about the work, it's about the adventure of learning! Don't be afraid to try new native plants in your garden, especially those with funky flowers.