How to upload a podcast in dotCMS
 Print
Print Email
EmailA tutorial in how to upload a podcast in dotCMS.
How to upload a podcast in dotCMS
Learn how to create a podcast entry in dotCMS
dotCMS Podcast Content Instructions - Technical
1. Log into dotCMS.
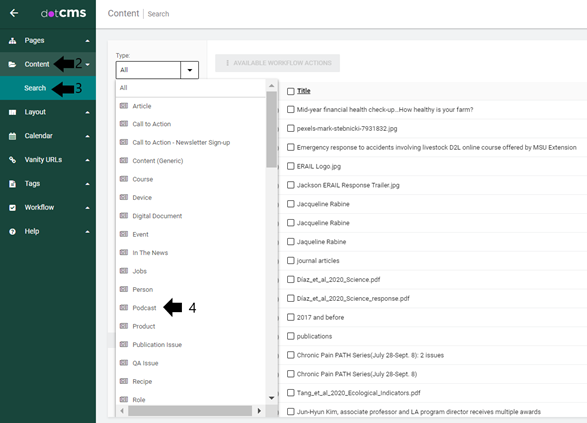
2. Select Content on the left side of the screen.
3. Select Search.
Content Dashboard
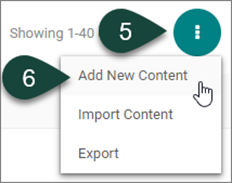
4. Select Podcast from the Type drop-down menu.
5. Select the Triple Vertical Dots button in the upper right-hand corner of the page.
6. Select Add New Content.
NOTE: Above most fields in the Content tab is Hint Text that further explains the field. It is recommended to read this information prior to filing in a particular field.
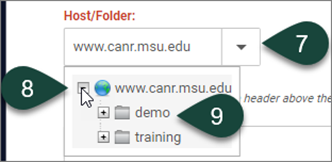
7. REQUIRED FIELD: Open the Host/Folder drop-down menu.
8. Select the Plus Sign (+) to twirl open the canr.msu.edu folder.
9. Select the Folder of the site you where you want to save the podcast.
TIP: If you forget to select a folder for the Host, then when you attempt to Save Draft or Save/Publish the podcast content you will receive an error stating “You don't have the required permissions to save the asset. User has no Add Children Permissions on selected host.” Do not close the podcast content entry, follow the steps above and resave or republish the podcast content entry. It should save/publish properly this time.
10. REQUIRED FIELD: Enter the Title of the podcast.
11. REQUIRED FIELD: URL Title will fill in automatically; however, you may change this if you so desire.
12. REQUIRED FIELD: Enter a short Summary for the podcast content entry.
TIP: The text for the Summary should be the first sentence or two of the podcast descriptions.
NOTE: The Summary shows on podcast listings and on reused content. It will not show on the podcast content entry page.
13. OPTIONAL: Upload an image for the podcast using the Browse button.

NOTE: If you do not plan to add an image to your podcast, skip to step 21.
14. If you select the Browse button, from the Select a file window, navigate to the uploads/images folder within the site folder that you selected for the Host field in steps 7-9.
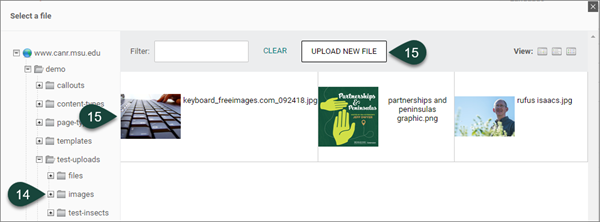
15. Either select an image that was previously uploaded to the Images folder or select the Upload New File button to upload a new image.
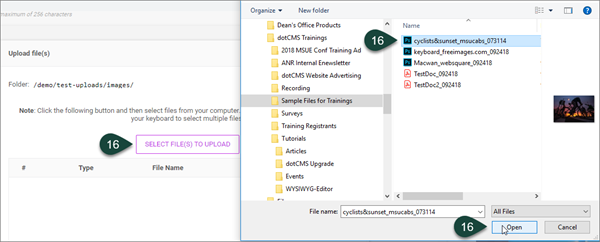
16. If you selected the Upload New File button, Select file(s) to upload button and navigate to where the image file resides on your computer, and choose the file and select Open.
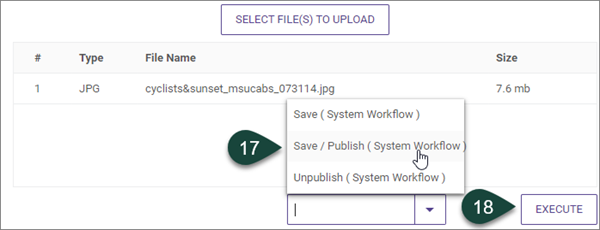
17. From the drop-up menu, select the Save/Publish button only.
NOTE: DO NOT select the Save Draft button. This will only save the image to the backend of the website and it will not appear live when you publish the Podcast. By selecting Save/Publish for the image, you are preparing the image for publishing live for the Podcast. It will not appear on the page until you Publish the Podcast.
18. Select the Execute button.
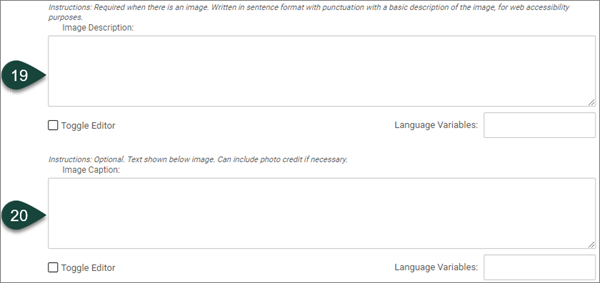
19. OPTIONAL: If you uploaded an image in step 13, you must enter an Image Description for web accessibility purposes, such as for use with assistive technology tools. The description needs to be written in sentence format with punctuation and is typically a basic, not detailed, description. For example, Person holding a bouquet of flowers.
20. OPTIONAL: If you uploaded an image in step 13, you can choose to enter an Image Caption to appear below the image on the podcast page.
TIP: If your photo needs to include attribution to the photographer, this is a great place to add a sentence like “Photo courtesy of …” or "Photo by …"
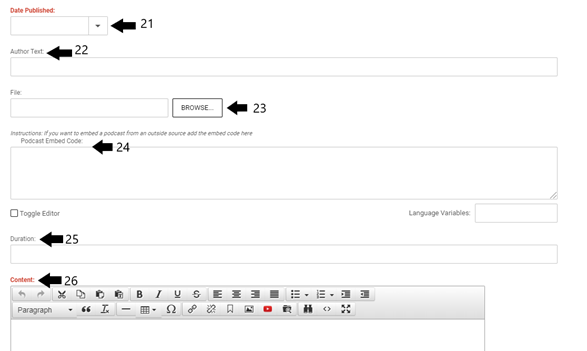
21. REQUIRED: Enter the Date Published for the podcast.
22. OPTIONAL: Enter the author(s) text. This could be the person or people who are responsible for coming up with the podcast content or the interviewers depending on the nature of it.
NOTE: Fill in with author(s) name(s) and email address(s) if the person(s) is not a part of MSU or does not have a Person Profile in dotCMS. Any names that exactly match a person’s name on their dotCMS profile will be automatically linked to their profile.
NOTE 2: It is helpful to include the organization name after the name(s) of the author(s). This is especially helpful for authors who are not MSU employees or do not have a person profile in dotCMS.
23. REQUIRED: Select a audio File to upload and include in the podcast. It will show on the live on the podcast page as a “DOWNLOAD FILE” button.
24. OPTIONAL: Entire the duration or length of the podcast.
25. OPTIONAL: Entire the embed code for the podcast if you are posting a podcast from an external website.
26. OPTIONAL: Use the WYSIWYG Editor to enter and format the podcast description Content, which can include a duplication of the Summary text content and any other details about podcast topics, sections, people featured, etc.
27. Select the Relationships Tab at the top of the screen. OPTIONAL: There are three types of relationships that can be applied: 1) Podcast-Series 2) Person: Child (AudioObject-FeaturedPerson), 3) Person: Child (AudioObject-Author).
- Podcast-Series: This is used to highlight a group of related podcasts
- Person: Child (AudioObject-FeaturedPerson): This relates the podcast to a person(s) that is featured in the podcast. This is often the person being interviewed by the podcast author or creator. They must have profile in dotCMS to make this relationship. This is the most common relationship that can be made.
- Person: Child (AudioObject-Author): This relates the person who creates the podcast, comes up with its content or is interviewing the guests. They must have profile in dotCMS to make this relationship. This is the most common relationship that can be made.
28. OPTIONAL: To apply a relationship, select the Relate button for the appropriate relationship type.

29. In the Search window that opens, under Title, First Name or Last Name fields, type in the name of the relationship you want to make, i.e., the name of the person for Person-Podcast. Or in the list of Matching Results select the relationship you want to make.
NOTE: Ignore the Language field as it defaults to the English language.

30. Scroll to the bottom of the Search screen and select the Search button.

31. From the Matching Results that appear, select the check box next to the most appropriate result.
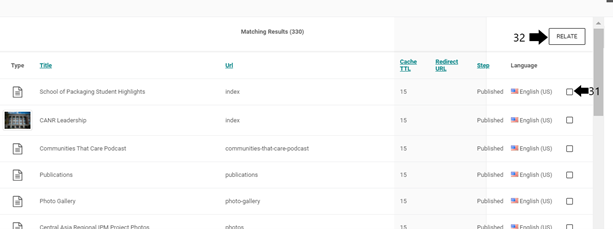
32. Select the Relate button and the relationship will appear
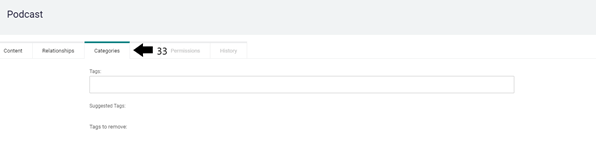
Podcast Categories Tab
33. Select the Categories Tab at the top of the screen. This tab enables you to create and select tags specific to the podcast
NOTE: When the podcast is Published, the tags will appear at the bottom of the web page and will be clickable. If you select one of these tags a web page will open that displays all content related to that specific tag from across all the college’s websites.
34. Put your cursor in the Tags field and start typing the name of the tag you would like to use.
TIP: It is better to use tags that are targeted and strategic, rather than a lot of single word tags. For example, “dotcms training” is a better tag to use than the words “dotcms,” “website” or “training.”
35. If a pre-set tag appears, you can select it.
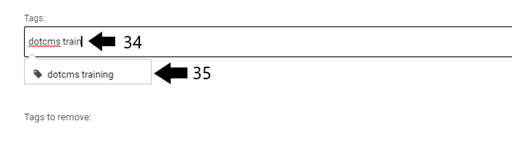
36. Your tag will now appear in the Tags field.

37. If a pre-set tag does not appear for the text you have typed, select the Enter key on your keyboard.
38. Your new tag will appear and have the outlined box showing around it like in Step 38.
NOTE: This new tag will go live as soon as you publish the podcast, and you will be able to select for it in the future.
39. The Suggested Tags field will display tags that may be relevant based on the podcast information input from the Content tab and other existing dotCMS tags that might be related. Select any tags that are applicable for the podcast.
NOTE: Not all tags listed as suggested will be appropriate and there may be others that you will need type in and select yourself, as explained in step 37.
40. The Tags to Remove field will display tags that have been selected as a tag that should no longer be used for content, which may include different versions of an existing tag. It is recommended to select any tag(s) that appear in this field and to not use them in the future. For example, “mimoneyhealth” will show up as a Tag to Remove, where as the tag “mi money health” is the preferred tag to use.
Podcast Date Tab
NOTE: There is no specific action you need to take in this tab. This information is strictly informative.
41. OPTIONAL: Select the Date Tab at the top of the screen. This tab allows you to select for a System Publish Date and a System Expiration Date.
TIP: It is best not to use these features. Instead you can create and Save Draft of the podcast to Publish live on the publish date, and Unpublish the podcast as needed.
NOTE: If you do use the fields in this tab, and you need to unpublish the podcast, you will have to first remove the date/time information and Publish the podcast. Then, you can select to Unpublish the podcast.