Basics of Atmospheric Steam Canning
DOWNLOADAugust 29, 2023 - Joyce McGarry and Laurie Messing, Michigan State University Extension
This Document is offered in: English Arabic, Espanol,
What Is Atmospheric Steam Canning? 
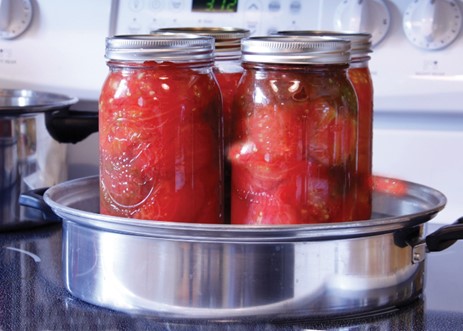
The National Center for Home Food Preservation has approved atmospheric steam canning (steam canning) as a safe method of home food preservation. An atmospheric steam canner (steam canner) is a shallow pan with a dome cover, large enough to fit over pint- and quart- sized canning jars. This method uses a small amount of water that produces steam within the canner and around the jars. Only use steam canning to preserve high-acid foods such as fruits, acidified tomatoes, pickled products, jams, jellies and preserves. Always use current research-based* water bath canning recipes when using a steam canner. For foods to be preserved in a steam canner, the recipes must have a processing time of 45 minutes or less. Processing foods in a steam canner beyond 45 minutes is unsafe because of the small amount of water the canner base will hold. The majority of high-acid foods are processed in 45 minutes or less but check your research-based recipe for exact processing times.
Advantages of Steam Canning
There are many advantages in using a steam canner when processing high-acid foods.
- Steam canners are made out of lightweight aluminum, whereas water bath canners are usually made of heavy porcelain-covered In addition, water bath canners made out of aluminum still weigh more than steam canners.
- A steam canner does not heat up a kitchen as much as a water bath canner.
- Steam canners use significantly less water, approximately 2½ quarts of water compared to the gallons needed for a water bath canner.
- The small amount of water needed for a steam canner makes it considerably easier to fill, handle and empty than a water bath canner.
- Due to the small amount of water in steam canners, time and energy are saved while reaching the 212 °F processing temperature. It also takes much less energy to maintain steam than boiling water.
Steps for successful atmospheric steam canning
- Fill the base of the steam canner with the amount of water recommended in the instruction manual.
- Wash canning jars and keep them hot until processing.
- There are two methods of packing food into hot canning jars:
- Raw pack is the process of packing raw, washed, prepared (peeled, cut-up, pitted or other) food into clean, hot canning jars, according to the recipe directions.
- Hot pack is the process of heating food and then promptly packing the food into clean, hot canning jars, according to the recipe directions.
- Cover raw or hot-packed food with boiling water, hot liquid, syrup or juice. Use a plastic spatula, bubble freer or wooden spoon around the inside of the jars to remove air bubbles. Air bubbles can keep the jar from sealing.
- Leave the amount of headspace at the top of the jar, according to recipe directions. Headspace is the space between the top of the jar and the food or liquid. Headspace allows food to expand when heated.
- After food is packed into hot jars, wipe jar rims with a clean, damp cloth or paper towel to secure an airtight seal. Place the canning lid with the sealing compound on the jar rim. Screw the metal band down fingertip- tight to hold the lid in place. Do not overtighten.
- Place filled jars in a preheated steam canner. The water in the canner base should be 140 °F for raw-packed foods and 180 °F for hot-packed foods.
- Place the dome of the steam canner over the jars and turn the stove burner up until a full, steady column of steam appears out of the venthole.
- Slowly lower the heat to maintain the recommended temperature inside the canner. Refer to the instruction manual.
- Follow processing times from research-based* recipes.
-
When processing time is complete, remove canner from the heat and let stand for 5 minutes. Then tilt the dome away from you as you remove the lid to avoid being burned by the steam. Extreme temperature differences can cause jar breakage.
-
Cool jars for 12 to 24 hours on a rack or towel away from drafts. After the jars have cooled completely, check to be sure all lids have sealed. Remove screw bands and check lids for a secure seal. Wash, dry, label, date and store jars in a cool, dry place.
Safety Tips
- Since the amount of water in the canner base limits the processing times to 45 minutes or less, do not process beyond 45 minutes.
- Do not open the canner to refill the water while processing foods.
- Adjust the processing time according to your elevation following a research-based* recipe.
- Use lids only once; you may reuse screw bands that are in good condition.
- Cool hot jars at room temperature away from drafts. Never rush the cooling process.
*Find research-based recipes developed for water bath canning, which can be used for steam canning, at the National Center for Home Food Preservation (http://nchfp.uga.edu/), University of Georgia Extension’s So Easy to Preserve (http://setp.uga.edu/), and the USDA Complete Guide to Home Canning (http://nchfp.uga.edu/publications/publications_usda.html)
References and Resources
- Ingham, B. (2017, Oct. 24). Safe preserving: Using a steam canner. Safe and Healthy Food for Your Family. University of Wisconsin–Extension. https://fyi.uwex.edu/safepreserving/2017/10/24/safe-preserving-using-a-steam-canner/
- National Center for Home Food Preservation. (2020, August 24). Burning issue: Using atmospheric steam canners. https://nchfp.uga.edu/publications/nchfp/factsheets/steam_canners.html.
More information


 Print
Print Email
Email


