Dehydrating Produce Basics
DOWNLOADAugust 9, 2023 - Karen Fifield and Ghaida Batarseh Havern, Michigan State University Extension
This Document is offered in: English, Arabic Espanol,
Dehydrating, or drying, is a method of food preservation that removes enough moisture from food so spoilage microorganisms cannot grow. To properly dry foods, a balance of temperature and humidity is required. Low humidity and high temperatures enable moisture to evaporate from food, while air circulation promotes faster drying. Michigan State University (MSU) Extension recommends using a research-tested recipe. You can find research-tested recipes on the Michigan Fresh website (canr.msu.edu/mi_fresh), National Center for Home Food Preservation website (homefoodpreservation.com), or the United States Department of Agriculture (USDA) (nchfp. uga.edu/publications/usda/INTRO_HomeCanrev0715.pdf).

Methods of Dehydrating
Dehydrator
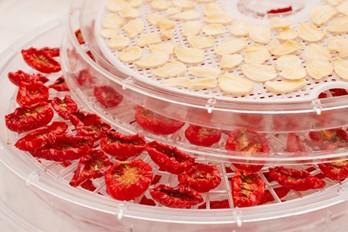
- Dehydrators are small electrical appliances used for drying food safely, efficiently, and uniformly indoors. An electrical element creates heat while a fan generates air movement. Compared to other drying techniques, dehydrators provide the highest quality due to their ability to dry foods evenly and quickly in a controlled environment. When using a dehydrator, plan on at least 6 hours to dry food. The length of time needed to dry food is dependent on the size of the food, thickness, and moisture (See tables 1 and 2 for drying times.)
Sun
- Sun drying involves constant exposure to direct sunlight during the day to generate heat and optimal low humidity levels of less than 20%. MSU Extension does not recommend sun drying in Michigan, due to high humidity levels and lack of adequate sunlight.
Oven
- Drying food in an oven will provide a dried product. Ensure that your oven can provide a low temperature of 140 °F, otherwise you may end up cooking the food rather than drying it. Leaving the oven door open and placing a fan just outside the oven can allow for air circulation to assist in drying. In comparison to using a dehydrator, drying in an oven consumes more energy and may take 2 to 3 times longer, up to 8 hours.
Air
- Air drying works best in low light and well-ventilated areas indoors. Good examples would be an attic, a spare room, or a screened-in porch. Herbs, peppers, mushrooms, and shelled nuts are good candidates for air drying.
Microwave
- There is no method to circulate air inside of a microwave, thus it should only be used for drying small batches of herbs. Microwave ovens are a fast way to dry only small amounts of herbs, per the National Center for Home Food Preservation (n.d.).
Dehydrating Produce
- Selection of produce: Select fresh, high-quality Before drying, rinse in cool water to eliminate dirt and chemical traces. Trim, peel, chop, slice, or shred the produce per research-tested recipe. Remove any damaged or bruised produce as necessary. Maintain equal sizes for even drying.
Fruits
- Pretreating fruit before drying: Use 1 teaspoon vitamin C (ascorbic acid) per 2 cups of cold Submerge fruit for 3 minutes, then drain well, and place on rack to begin drying.
- Fruit leathers: Prepare the fruit per research-tested recipe to make leather. You may use plastic wrap to line the trays. Some dehydrators might come with plastic designed for this purpose. Pour the mixture onto the lined trays and spread it evenly to a thickness of ⅛ inch. Dry the fruit leather at 140 °F. This process may take 8 to 12 hours depending on the moisture content. Leather is dry when you cannot make an indentation when pressing down in the middle and it should not break when bent.
See Table 1 for drying times of fruits.
Vegetables
- Blanching vegetables before drying: Vegetables must be blanched prior to drying. Blanching will help maintain color, taste, and result in longer storage times.
- Water blanching: Although quicker than steam blanching, this method may result in nutrient or color loss. Fill a large pot ⅔ full of water, cover, and bring to a rolling boil. Place the vegetables in a wire basket or a colander and submerge them per research-tested recipe.
- Steam blanching: Fill pot with water and bring to a boil. Place vegetables loosely in the basket and set it inside the pot, making sure the water does not come in contact with the Cover and steam per research-tested recipe.
After blanching is completed, see Table 2 for drying times of vegetables.
Herbs
- Herbs: Rinse herbs under cool, running water and shake to remove excess moisture. Remove any damaged or wilted foliage. Dry herbs by tying the stems into small bundles with twine or string and hanging them upside down in a warm, dry, well-ventilated, low-lit area away from direct sunlight. Be sure to allow for good air circulation around each bunch. Herbs are dry when they are brittle and easy to crumble.
Storage Guidelines
- First, check for Vegetables and herbs should feel brittle at approximately 10% moisture, and fruits should feel like leather.
- Completely cool dried food prior to storing.
- Choose a proper storage container. Proper storage containers are moisture and vapor resistant, have a tight seal, and prevent insects and rodents from getting in. You may use glass jars, plastic containers, or metal tins.
- Recheck for If you see moisture, remove food, and re-dry. If food is moldy, discard.
Drying Times for Fruits and Vegetables
|
Table 1. Drying Fruits in a Dehydrator |
|
|
Fruit |
Drying Times (hours) |
|
Apples |
6–12 |
|
Apricots |
24–36 |
|
Bananas |
8–10 |
|
Berries |
24–36 |
|
Cherries |
24–36 |
|
Grapes |
12–20 |
|
Peaches |
36–48 |
|
Pears |
24–36 |
|
Plums |
24–36 |
|
Table 1 adapted with permission from Preserving Food: Drying Fruits and Vegetables, edited by J. A. Harrison and E. L. Andress, University of Georgia Cooperative Extension, 2000, p. 8-9. https://nchfp.uga.edu/ publications/uga/uga_dry_fruit.pdf |
|
|
Table 2. Drying Vegetables in a Dehydrator |
|
|
Vegetable |
Drying Times (hours) |
|
Artichokes-Globe |
4–6 |
|
Asparagus |
4–6 |
|
Beans, Green |
8–14 |
|
Beets |
10–12 |
|
Broccoli |
12–15 |
|
Carrots |
10–12 |
|
Celery |
10–16 |
|
Corn |
6–10 |
|
Eggplant |
12–14 |
|
Garlic |
6–8 |
|
Greens (spinach, kale, chard, turnip) |
8–10 |
|
Horseradish |
4–10 |
|
Okra |
8–10 |
|
Onions |
3–9 |
|
Parsley |
1–2 |
|
Peas, Green |
8–10 |
|
Peppers |
8–12 |
|
Potatoes |
8–12 |
|
Pumpkin |
10–16 |
|
Squash, Summer |
10-12 |
|
Tomatoes |
10–18 |
|
Table 2 adapted with permission from Preserving Food: Drying Fruits and Vegetables, edited by J. A. Harrison and E. L. Andress, University of Georgia Cooperative Extension, 2000, p. 10-11. https://nchfp.uga.edu/ publications/uga/uga_dry_fruit.pdf |
|
References
- Andress, E., & Harrison, J. A. (Eds.).(2000). Preserving food: Drying fruits and vegetables. University of Georgia Cooperative Extension Service. https://nchfp.uga.edu/ publications/uga/uga_dry_fruit.pdf
- National Center for Home Food Preservation. (n.d.). How do I . . . dry? https://nchfp.uga.edu/how/dry.html#gsc.tab=0
More information


 Print
Print Email
Email


